Tile spacers are small, often overlooked tools that play a crucial role in tile installation. They are typically made of plastic and come in various shapes and sizes, designed to provide a consistent gap between tiles. This gap, known as the grout line, is filled with grout after the tiles have been set in place, providing a finished look to the tiled surface.
Tile spacers are not a modern invention. They have been used for centuries in various forms, from small pebbles to pieces of wood. However, modern tile spacers are designed for ease of use, consistency, and accuracy, making them an indispensable tool for both professional tilers and DIY enthusiasts.
Despite their simplicity, tile spacers can significantly impact the final appearance and durability of a tiled surface. They ensure that each tile is placed at an equal distance from its neighbors, resulting in a symmetrical, professional-looking finish.
Our Top Tile Spacer Picks
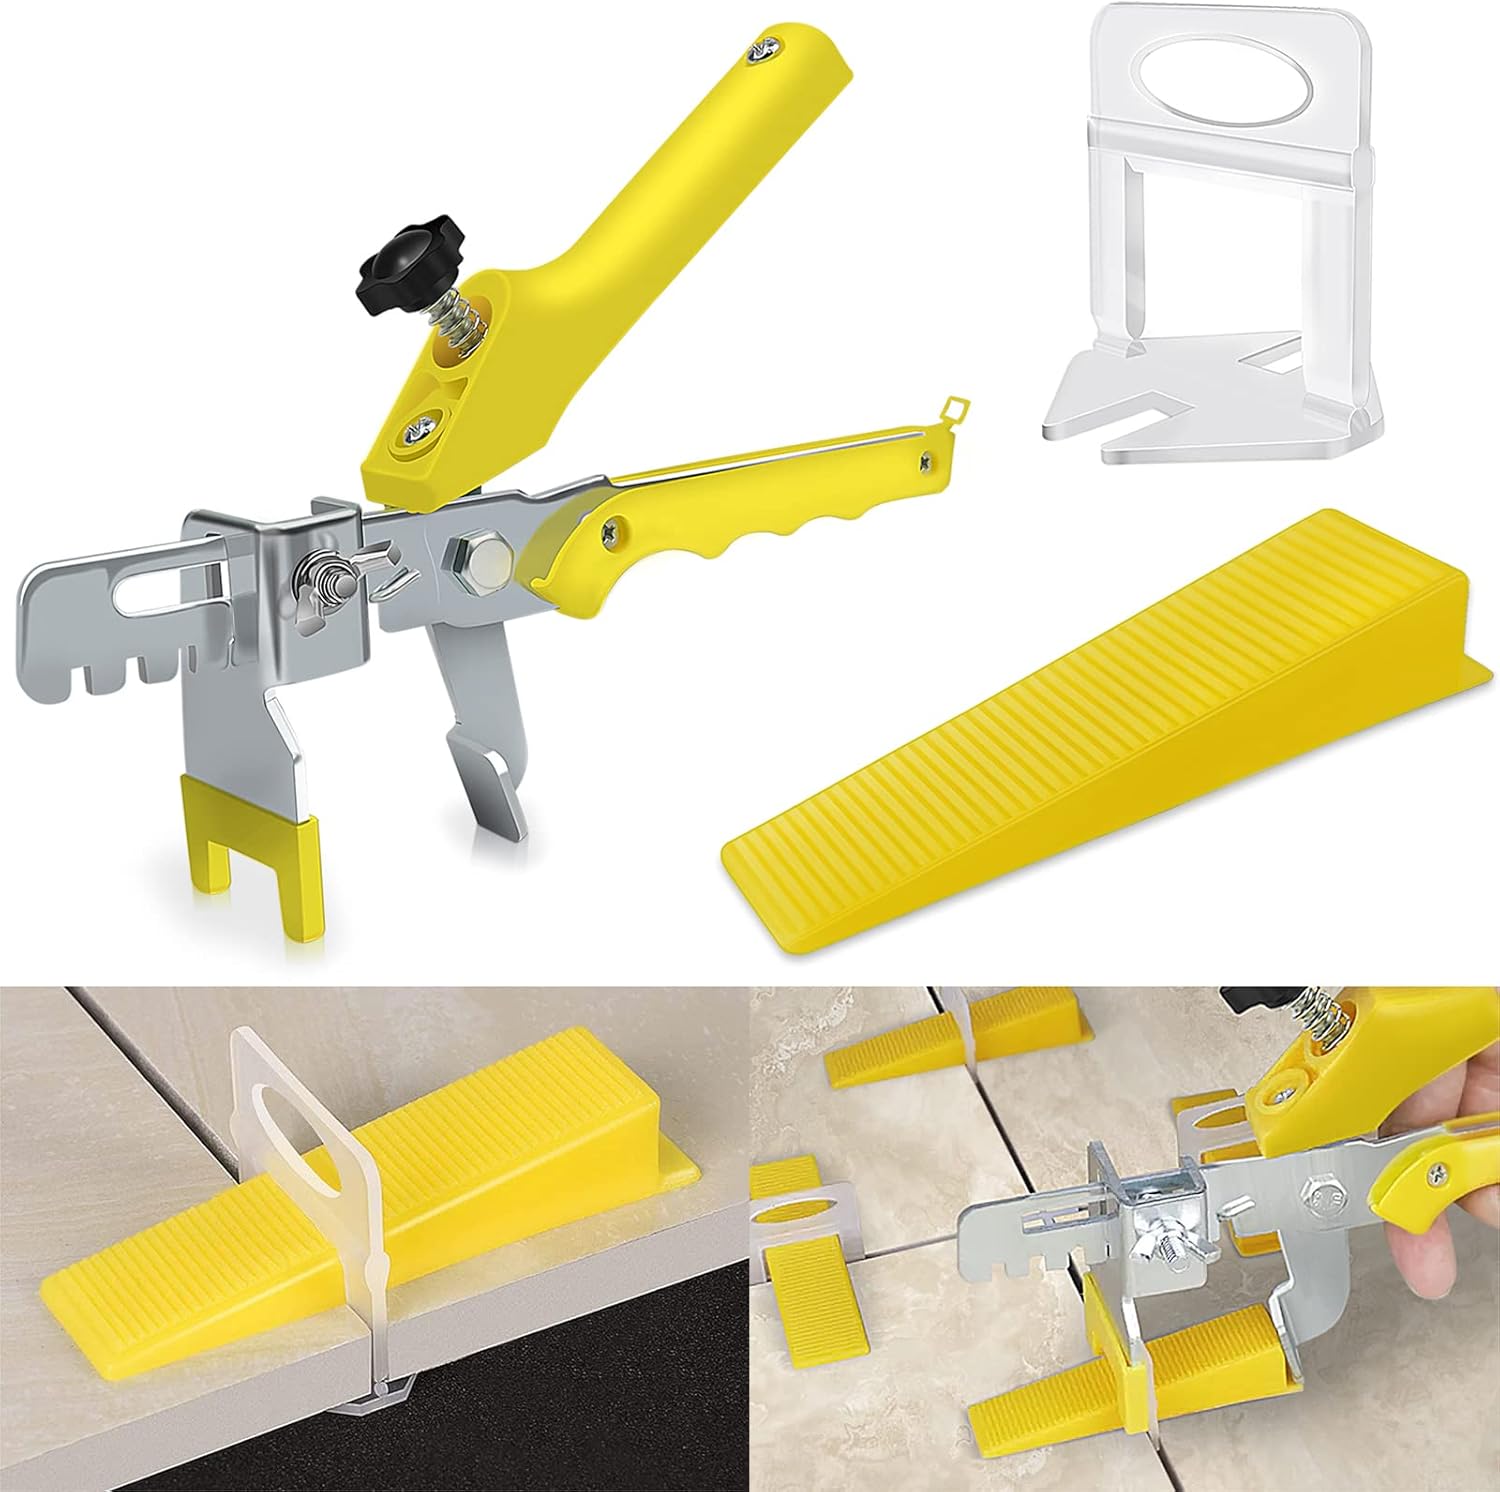
DGSL Tile Leveling System with Tile Plier – 300-Piece Tile Spacers Clips
Check on Amazon
Key Specs
- System Includes: 300 tile clips, 100 reusable wedges, and 1 tile plier
- Tile Thickness: Works with tiles 1/8″ (3mm) to 1/2″ (12mm) thick
- Clip Usage: 1 tile requires 4 wedges and 4 spacers
- Minimum Grout Joint: 1/16″ grout joint
- Application: Suitable for both wall and floor tile installations
The DGSL Tile Leveling System is an essential tool for anyone working with floor and wall tile installations. It guarantees a perfect, lippage-free finish by ensuring flatness between tiles and preventing movement during the mortar setting process. The system includes 300 disposable tile clips that accommodate tile thicknesses from 1/8″ (3mm) to 1/2″ (12mm) and 100 reusable wedges that secure the tiles firmly. The included tile plier makes installation quick and efficient, saving you time while achieving professional results.
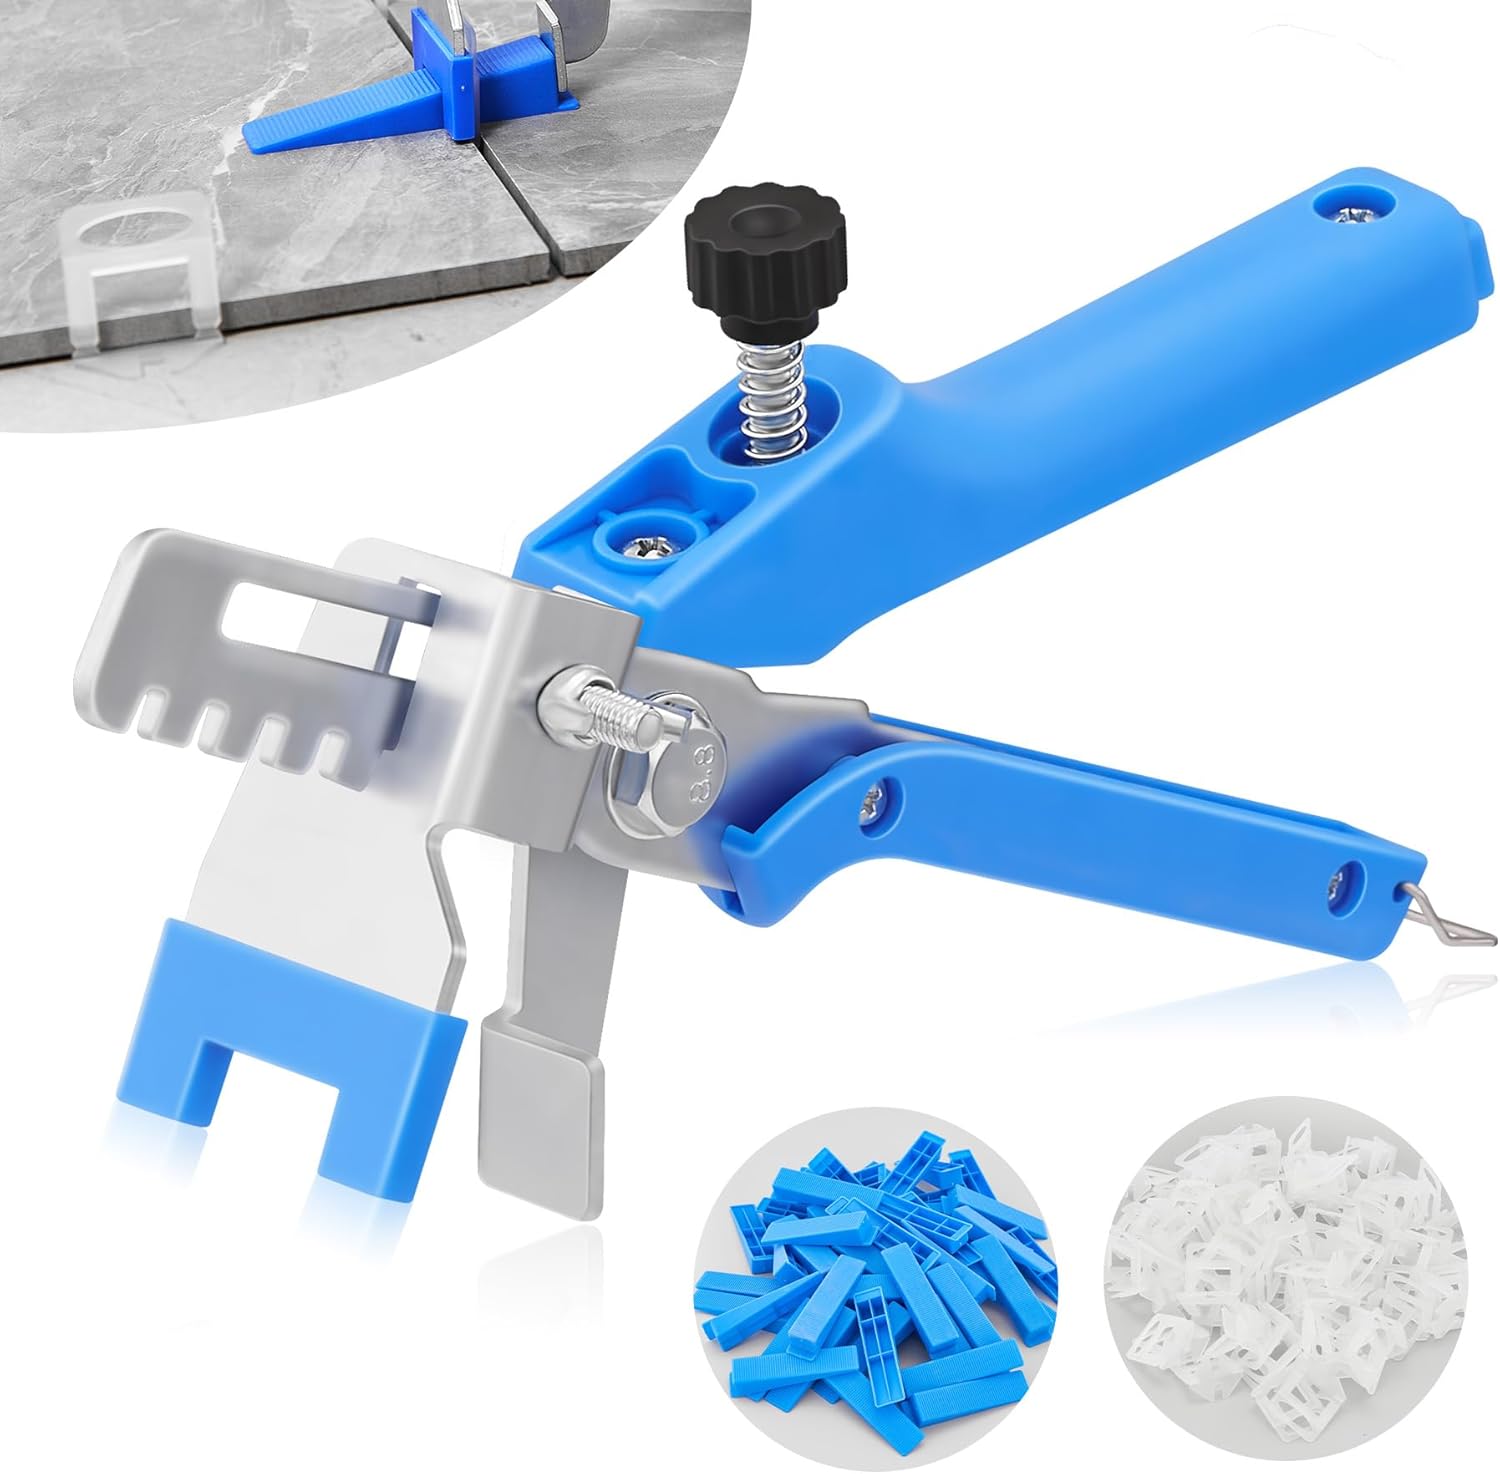
Saker Tile Leveling System 1/8 Inch with Tile Plier, 500pcs Tile Leveler Spacers
Check on Amazon
Key Specs:
- System Includes: 500 tile clips, 100 wedges, and upgraded tile pliers
- Tile Thickness Compatibility: 1/8″ (3mm) to 1/2″ (12mm)
- Grout Joint Size: Minimum 1/8″ grout joint
- Materials: Suitable for porcelain, ceramic, marble, and natural stone tiles
- Plier Design: Ergonomically designed with a metal clasp for increased durability and adjustability
The Saker Tile Leveling System is designed for both DIY enthusiasts and professional tilers, providing an effective solution for ensuring perfectly aligned and flat tiles. The upgraded large tile pliers improve ergonomics, offering a more comfortable grip and greater control during use. The durable metal clasp design enhances the longevity and reliability of the tool. With 500 disposable clips and 100 precision wedges, this system ensures tiles stay securely in place, while the adjustable pliers provide flexibility for various tile thicknesses.
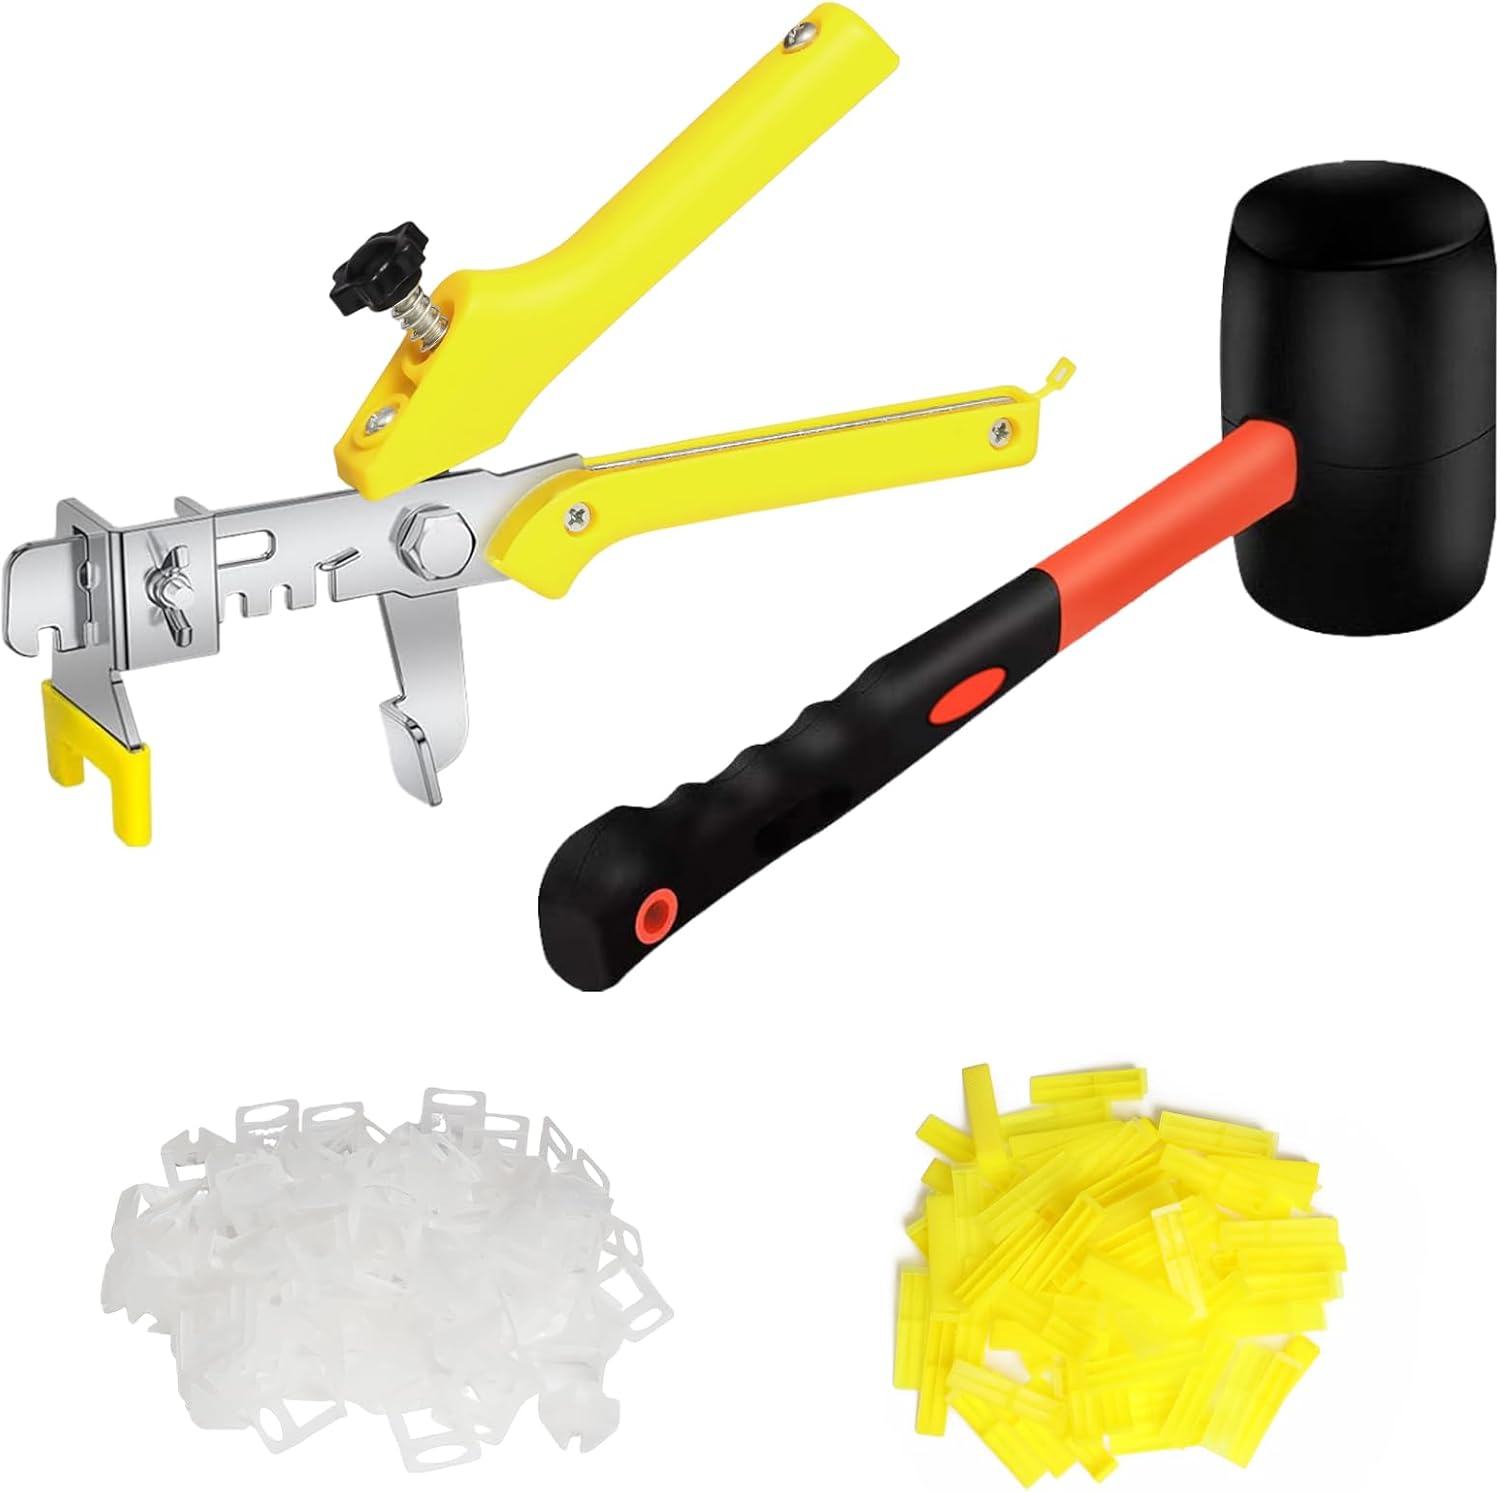
Storystore Tile Leveling System with Tile Pliers and Hammer – 600 Piece Tile Spacers
Check on AmazonKey Specs:
- System Includes: 600 tile spacer clips, 200 reusable wedges, 1 tile plier, 1 hammer
- Tile Thickness Compatibility: Suitable for 1/8″, 1/16″, and 1/32″ tile spacers
- Reusable Wedges: Durable and easy to install, providing firm tile hold
- Installation Method: Quick and easy to install and disassemble with the included hammer
- Customer Support: 90-day return policy for a risk-free purchase experience
The Storystore Tile Leveling System is an excellent choice for both professional tilers and DIY enthusiasts. This kit includes 600 tile spacer clips, 200 reusable wedges, tile pliers, and a hammer, providing everything you need for an efficient tiling job. The reusable wedges are durable and fit well with various tile spacers, ensuring precise leveling. The disposable clips securely hold tiles in place, while the included hammer makes disassembly easy. This comprehensive set enhances your productivity and ensures even tile placement with minimal effort.

DGSL Tile Leveling System Tile Spacers
Check on AmazonKey Specs:
- Material: High-quality solid plastic, reusable
- Seam Width: 1/16 inch (1.5mm) grout joints
- Usage: Suitable for horizontal and vertical tile installations
- Quantity: 300 spacers (3 packs of 100 each)
- Compatibility: Works with marble, granite, porcelain, and tiles of all sizes
The DGSL Tile Leveling System Tile Spacers are a game-changer for anyone looking to achieve perfectly aligned tiles with minimal effort. Made from durable high-quality solid plastic, these spacers are designed for reuse, ensuring long-lasting reliability. They are ideal for both horizontal and vertical tile installations on a variety of materials including marble, granite, and porcelain. The 1/16 inch grout joint width helps create a clean, professional finish while the set of 300 spacers is perfect for large projects.

DGSL Tile Leveling System Clips – 500-Piece DIY Tiles Leveler Spacers
Check on Amazon
Key Specs:
- Quantity: 500 leveling spacer clips
- Tile Thickness Compatibility: 1/8″ to 1/2″
- Grout Joint Width: 1/8″
- Usage: Ideal for both floor and wall tile installation
- Material: High-quality PVC forged for easy disassembly
The DGSL Tile Leveling System Clips are perfect for achieving flawless, level tiles with ease. With 500 clips included in the package, these spacers are designed to handle tiles ranging from 1/8″ to 1/2″ thickness, and are ideal for creating a 1/8″ grout joint. They work efficiently for both floor and wall installations, helping to prevent lippage and ensuring perfect tile alignment. The clips are easy to install, remove, and disassemble, making the process faster and cleaner for both DIYers and professionals.
Importance of Precise Tile Alignment
Tile alignment is a critical aspect of any tile installation project. Precise tile alignment ensures that the finished surface is not only visually appealing but also functional and durable. Without proper alignment, tiles can become uneven, leading to potential tripping hazards and making the surface difficult to clean.
Moreover, precise tile alignment is essential for the aesthetic value of the tiled surface. Even the most beautiful tiles can look amateurish and unattractive if they are not correctly aligned. On the other hand, even the simplest tiles can look stunning if they are perfectly aligned.
In addition to aesthetics and functionality, precise tile alignment also contributes to the longevity of the tiled surface. Properly aligned tiles are less likely to crack or chip, ensuring that the surface remains beautiful and functional for many years.
Understanding Tile Spacers
Definition and Function of Tile Spacers
Tile spacers are small tools used to ensure consistent spacing between tiles during installation. They are typically made of plastic and come in various shapes and sizes to accommodate different tile sizes and patterns. The primary function of tile spacers is to create uniform grout lines, which contribute to the overall aesthetic and functionality of the tiled surface.
Tile spacers are placed at the corners of tiles during installation, effectively creating a gap between each tile. Once the tiles have been set and the adhesive has dried, the spacers are removed, and the gaps are filled with grout. This process ensures that each tile is evenly spaced, resulting in a symmetrical, professional-looking finish.
While tile spacers are a simple tool, they play a crucial role in tile installation. Without them, it would be challenging to maintain consistent spacing between tiles, especially over larger areas. This could result in uneven grout lines, which can detract from the overall appearance of the tiled surface.
The Role of Tile Spacers in Tile Installation
Tile spacers play a crucial role in tile installation, ensuring that each tile is evenly spaced and aligned. This is particularly important in larger projects, where maintaining consistent spacing can be challenging. By using tile spacers, tilers can ensure that each tile is placed at an equal distance from its neighbors, resulting in a symmetrical, professional-looking finish.
Moreover, tile spacers also help to ensure that the grout lines are straight and even. This is important not only for the aesthetic value of the tiled surface but also for its functionality. Straight, even grout lines are easier to clean and less likely to harbor dirt and bacteria.
Finally, tile spacers can also help to prevent tile lippage – a condition where one edge of a tile is higher than the adjacent tile. Tile lippage can create a tripping hazard and can also make the surface difficult to clean. By ensuring that each tile is evenly spaced and aligned, tile spacers can help to prevent this problem.
Importance of Precise Tile Alignment
Aesthetic Value of Precise Tile Alignment
Precise tile alignment is essential for the aesthetic value of any tiled surface. Even the most beautiful tiles can look amateurish and unattractive if they are not correctly aligned. On the other hand, even the simplest tiles can look stunning if they are perfectly aligned.
Moreover, precise tile alignment can enhance the overall design of the space. For example, in a small room, perfectly aligned tiles can create the illusion of a larger space. Similarly, in a large room, well-aligned tiles can add structure and order, making the space feel more comfortable and inviting.
Finally, precise tile alignment can also enhance the visual impact of patterned tiles. By ensuring that each tile is perfectly aligned, the pattern can flow seamlessly across the surface, creating a stunning visual effect.
Practical Benefits of Precise Tile Alignment
In addition to its aesthetic value, precise tile alignment also has several practical benefits. First and foremost, properly aligned tiles are easier to clean. Dirt and debris are less likely to get trapped in the grout lines, making the surface easier to maintain.
Moreover, properly aligned tiles are less likely to crack or chip. This is because the pressure is evenly distributed across the surface, reducing the risk of damage. As a result, a well-aligned tiled surface is likely to last longer and require less maintenance than a poorly aligned one.
Finally, precise tile alignment can also improve the safety of the surface. Uneven tiles can create tripping hazards, especially in high-traffic areas. By ensuring that each tile is perfectly aligned, these risks can be minimized.
Types of Tile Spacers
Cross-Shaped Spacers
Cross-shaped tile spacers are the most common type of tile spacers. They are designed to be placed at the intersection of four tiles, creating a consistent gap at each corner. Cross-shaped spacers are ideal for grid patterns, where the tiles are aligned in straight lines.
One of the main advantages of cross-shaped spacers is their simplicity. They are easy to use and can be quickly removed once the adhesive has dried. Moreover, they are available in a wide range of sizes, making them suitable for various tile sizes and grout line widths.
However, cross-shaped spacers are not suitable for all tile patterns. For example, they cannot be used for herringbone or diagonal patterns. For these patterns, other types of spacers, such as T-shaped or Y-shaped spacers, are required.
T-Shaped Spacers
T-shaped tile spacers are designed to be placed at the intersection of three tiles. They are ideal for brick or subway patterns, where the tiles are offset by half the width of the tile. T-shaped spacers ensure that each tile is evenly spaced, resulting in a symmetrical, professional-looking finish.
One of the main advantages of T-shaped spacers is their versatility. They can be used for a wide range of tile patterns, including grid, brick, and subway patterns. Moreover, they are available in a variety of sizes, making them suitable for various tile sizes and grout line widths.
However, like cross-shaped spacers, T-shaped spacers are not suitable for all tile patterns. For example, they cannot be used for herringbone or diagonal patterns. For these patterns, other types of spacers, such as Y-shaped spacers, are required.
Y-Shaped Spacers
Y-shaped tile spacers are designed to be placed at the intersection of three tiles in a Y pattern. They are ideal for herringbone patterns, where the tiles are arranged in a zigzag pattern. Y-shaped spacers ensure that each tile is evenly spaced, resulting in a symmetrical, professional-looking finish.
One of the main advantages of Y-shaped spacers is their ability to accommodate complex tile patterns. They are one of the few types of spacers that can be used for herringbone patterns, making them a valuable tool for professional tilers and DIY enthusiasts.
However, Y-shaped spacers can be more difficult to use than other types of spacers. They require careful placement to ensure that each tile is evenly spaced. Moreover, they are not suitable for all tile patterns. For example, they cannot be used for grid or brick patterns. For these patterns, other types of spacers, such as cross-shaped or T-shaped spacers, are required.
Specialized Spacers
In addition to the standard cross-shaped, T-shaped, and Y-shaped spacers, there are also specialized spacers designed for specific tile patterns or applications. For example, there are spacers designed for large format tiles, which require wider grout lines to accommodate the size of the tiles.
There are also spacers designed for specific types of tiles, such as glass or stone tiles. These spacers are often made of a softer material to prevent scratching or damaging the tiles.
While specialized spacers can be more expensive than standard spacers, they can be a valuable tool for complex tile installation projects. They can ensure that each tile is perfectly aligned, resulting in a professional-looking finish.
Choosing the Right Size of Tile Spacers
Factors Influencing the Size of Tile Spacers
The size of the tile spacers you choose can significantly impact the final appearance of your tiled surface. There are several factors to consider when choosing the size of your tile spacers, including the size and type of your tiles, the desired grout line width, and the tile pattern.
The size of your tiles is one of the most important factors to consider. Larger tiles typically require larger spacers to accommodate the size of the tiles and to ensure that the grout lines are proportionate to the size of the tiles. On the other hand, smaller tiles typically require smaller spacers to maintain a consistent grout line width.
The type of your tiles can also influence the size of your spacers. For example, tiles with a rough or uneven surface may require larger spacers to accommodate the irregularities in the tile surface. Similarly, tiles with a beveled edge may require smaller spacers to ensure that the grout lines are not too wide.
Common Sizes of Tile Spacers and Their Uses
Tile spacers come in a variety of sizes to accommodate different tile sizes and patterns. The most common sizes are 1/16 inch, 1/8 inch, 3/16 inch, and 1/4 inch. However, there are also larger spacers available for large format tiles or for specific tile patterns.
1/16 inch spacers are the smallest size and are typically used for mosaic tiles or for tiles with a beveled edge. They create a thin grout line, which can enhance the overall design of the tiled surface.
1/8 inch spacers are a versatile size that can be used for a wide range of tile sizes and patterns. They create a medium-width grout line, which is suitable for most applications.
3/16 inch and 1/4 inch spacers are larger sizes that are typically used for larger tiles or for tiles with a rough or uneven surface. They create a wide grout line, which can accommodate the size of the tiles and the irregularities in the tile surface.
Finally, there are also larger spacers available for large format tiles or for specific tile patterns. These spacers can create a very wide grout line, which can enhance the overall design of the tiled surface.
Material Considerations for Tile Spacers
Plastic Tile Spacers
Plastic is the most common material used for tile spacers. It is lightweight, durable, and easy to work with, making it an ideal material for this application. Plastic spacers are also affordable, making them a cost-effective choice for both professional tilers and DIY enthusiasts.
One of the main advantages of plastic spacers is their flexibility. They can be easily adjusted to fit the space between the tiles, ensuring a consistent grout line width. Moreover, they can be easily removed once the adhesive has dried, without damaging the tiles or the grout.
However, plastic spacers are not suitable for all applications. For example, they may not be strong enough for large format tiles, which require wider grout lines to accommodate the size of the tiles. In these cases, other types of spacers, such as rubber or metal spacers, may be required.
Rubber Tile Spacers
Rubber tile spacers are a popular choice for professional tilers due to their durability and flexibility. They are stronger than plastic spacers, making them suitable for larger tiles or for tiles with a rough or uneven surface.
One of the main advantages of rubber spacers is their ability to maintain their shape under pressure. This means that they can hold the tiles in place more effectively, ensuring a consistent grout line width. Moreover, they can be easily removed once the adhesive has dried, without damaging the tiles or the grout.
However, rubber spacers are typically more expensive than plastic spacers. They may also be more difficult to find, as they are not as widely available as plastic spacers. Nevertheless, their durability and flexibility make them a worthwhile investment for complex tile installation projects.
Metal Tile Spacers
Metal tile spacers are the strongest type of spacers and are typically used for large format tiles or for tiles with a rough or uneven surface. They are made of steel or aluminum and are designed to withstand high levels of pressure, making them suitable for heavy-duty applications.
One of the main advantages of metal spacers is their durability. They can hold the tiles in place more effectively than plastic or rubber spacers, ensuring a consistent grout line width. Moreover, they can be easily removed once the adhesive has dried, without damaging the tiles or the grout.
However, metal spacers are typically the most expensive type of spacers. They may also be more difficult to find, as they are not as widely available as plastic or rubber spacers. Nevertheless, their strength and durability make them a worthwhile investment for heavy-duty tile installation projects.
How to Use Tile Spacers
Step-by-Step Guide on Using Tile Spacers
Using tile spacers is a straightforward process, but it requires careful attention to detail to ensure a consistent grout line width. Here is a step-by-step guide on how to use tile spacers:
1. Start by laying out your tiles on a flat surface, such as a table or the floor. This will give you an idea of how the tiles will look once they are installed.
2. Apply the adhesive to the back of the first tile using a notched trowel. The size of the notches should correspond to the size of the tile spacers you are using.
3. Place the tile on the surface, pressing it firmly into the adhesive. Make sure the tile is level and aligned with the surrounding tiles.
4. Place the tile spacers at the corners of the tile, ensuring that they are flush with the tile surface. The spacers should be positioned so that they create a consistent gap between the tiles.
5. Continue this process with the remaining tiles, making sure to check the alignment and level of each tile as you go.
6. Once the adhesive has dried, remove the spacers by gently pulling them out. Do not twist or force the spacers, as this could damage the tiles or the grout.
7. Fill the gaps between the tiles with grout, using a grout float to press the grout into the gaps. Wipe away any excess grout with a damp sponge.
8. Allow the grout to dry completely before walking on the surface or applying any sealant.
Common Mistakes to Avoid When Using Tile Spacers
While using tile spacers is a straightforward process, there are several common mistakes that can affect the final appearance of your tiled surface. Here are some mistakes to avoid:
1. Not using spacers: This is perhaps the most common mistake. Without spacers, it is almost impossible to maintain a consistent grout line width, resulting in an uneven and unprofessional finish.
2. Using the wrong size spacers: The size of the spacers should correspond to the size of the tiles and the desired grout line width. Using the wrong size spacers can result in uneven grout lines or tiles that are too close together or too far apart.
3. Not removing the spacers in time: Spacers should be removed once the adhesive has dried, but before the grout is applied. If the spacers are left in too long, they can become stuck in the adhesive, making them difficult to remove without damaging the tiles or the grout.
4. Not checking the alignment and level of the tiles: Even with spacers, it is important to check the alignment and level of each tile as you go. This will ensure that the tiles are evenly spaced and level, resulting in a professional-looking finish.
The Role of Tile Spacers in Different Tile Patterns
Straight Lay Pattern
The straight lay pattern is the simplest and most common tile pattern. It involves laying the tiles in straight lines, with each tile aligned with the tiles next to it and below it. This pattern is ideal for small spaces, as it can make the space appear larger.
Tile spacers play a crucial role in the straight lay pattern. They ensure that each tile is evenly spaced, resulting in a symmetrical, professional-looking finish. Cross-shaped spacers are typically used for this pattern, as they can be placed at the intersection of four tiles to create a consistent gap at each corner.
However, the size of the spacers can vary depending on the size of the tiles and the desired grout line width. For example, larger tiles typically require larger spacers to accommodate the size of the tiles and to ensure that the grout lines are proportionate to the size of the tiles.
Diagonal Lay Pattern
The diagonal lay pattern involves laying the tiles at a 45-degree angle to the walls. This pattern can add visual interest to the space and can make the space appear larger. It is ideal for large spaces or for spaces with irregular shapes.
Tile spacers play a crucial role in the diagonal lay pattern. They ensure that each tile is evenly spaced, resulting in a symmetrical, professional-looking finish. Cross-shaped spacers are typically used for this pattern, as they can be placed at the intersection of four tiles to create a consistent gap at each corner.
However, the size of the spacers can vary depending on the size of the tiles and the desired grout line width. For example, larger tiles typically require larger spacers to accommodate the size of the tiles and to ensure that the grout lines are proportionate to the size of the tiles.
Herringbone Pattern
The herringbone pattern involves laying the tiles in a zigzag pattern. This pattern can add visual interest to the space and can make the space appear larger. It is ideal for large spaces or for spaces with irregular shapes.
Tile spacers play a crucial role in the herringbone pattern. They ensure that each tile is evenly spaced, resulting in a symmetrical, professional-looking finish. Y-shaped spacers are typically used for this pattern, as they can be placed at the intersection of three tiles to create a consistent gap at each corner.
However, the size of the spacers can vary depending on the size of the tiles and the desired grout line width. For example, larger tiles typically require larger spacers to accommodate the size of the tiles and to ensure that the grout lines are proportionate to the size of the tiles.
Cleaning and Maintenance of Tile Spacers
Proper Cleaning Techniques for Tile Spacers
Proper cleaning and maintenance of tile spacers can extend their lifespan and ensure their effectiveness. Here are some tips for cleaning tile spacers:
Remove any adhesive or grout from the spacers as soon as possible. If the adhesive or grout dries on the spacers, it can be difficult to remove and can damage the spacers.
FAQ
What is a tile spacer?
A tile spacer is a small, often plastic, tool used to maintain consistent gaps between tiles during installation, ensuring even spacing for grout.
How does a tile spacer work?
It is inserted between tiles as they are laid down, creating uniform spaces for grout and helping ensure straight lines and a professional finish.
What are the benefits of using a tile spacer?
It helps achieve uniform spacing between tiles, improves the appearance of the finished project, and ensures proper grout application.
Can tile spacers be reused?
Yes, tile spacers can typically be reused if they are in good condition, although many people choose to dispose of them after one use for convenience.
What sizes of tile spacers are available?
Tile spacers come in various sizes, typically ranging from 1/16 inch to 1/2 inch, depending on the desired gap between tiles.