A tape measure is an essential tool in every workshop, home, and job site. Its versatility and accuracy make it indispensable for everything from measuring spaces to ensuring precise cuts in woodworking, construction, or even home improvement projects. Available in different lengths, from compact 12-foot models to heavy-duty 100-foot versions, tape measures cater to various needs.
The flexibility of a tape measure allows it to wrap around corners, fit into tight spaces, and measure long distances with ease. Many models come with a locking mechanism to keep measurements in place, and some even feature marks for easy fraction measurement, perfect for woodworking.
Whether you’re laying flooring, building furniture, or hanging a picture frame, a tape measure provides the precision you need for a perfect fit every time. It’s a tool no craftsman or DIYer should be without.
Our Top Tape Measure Picks
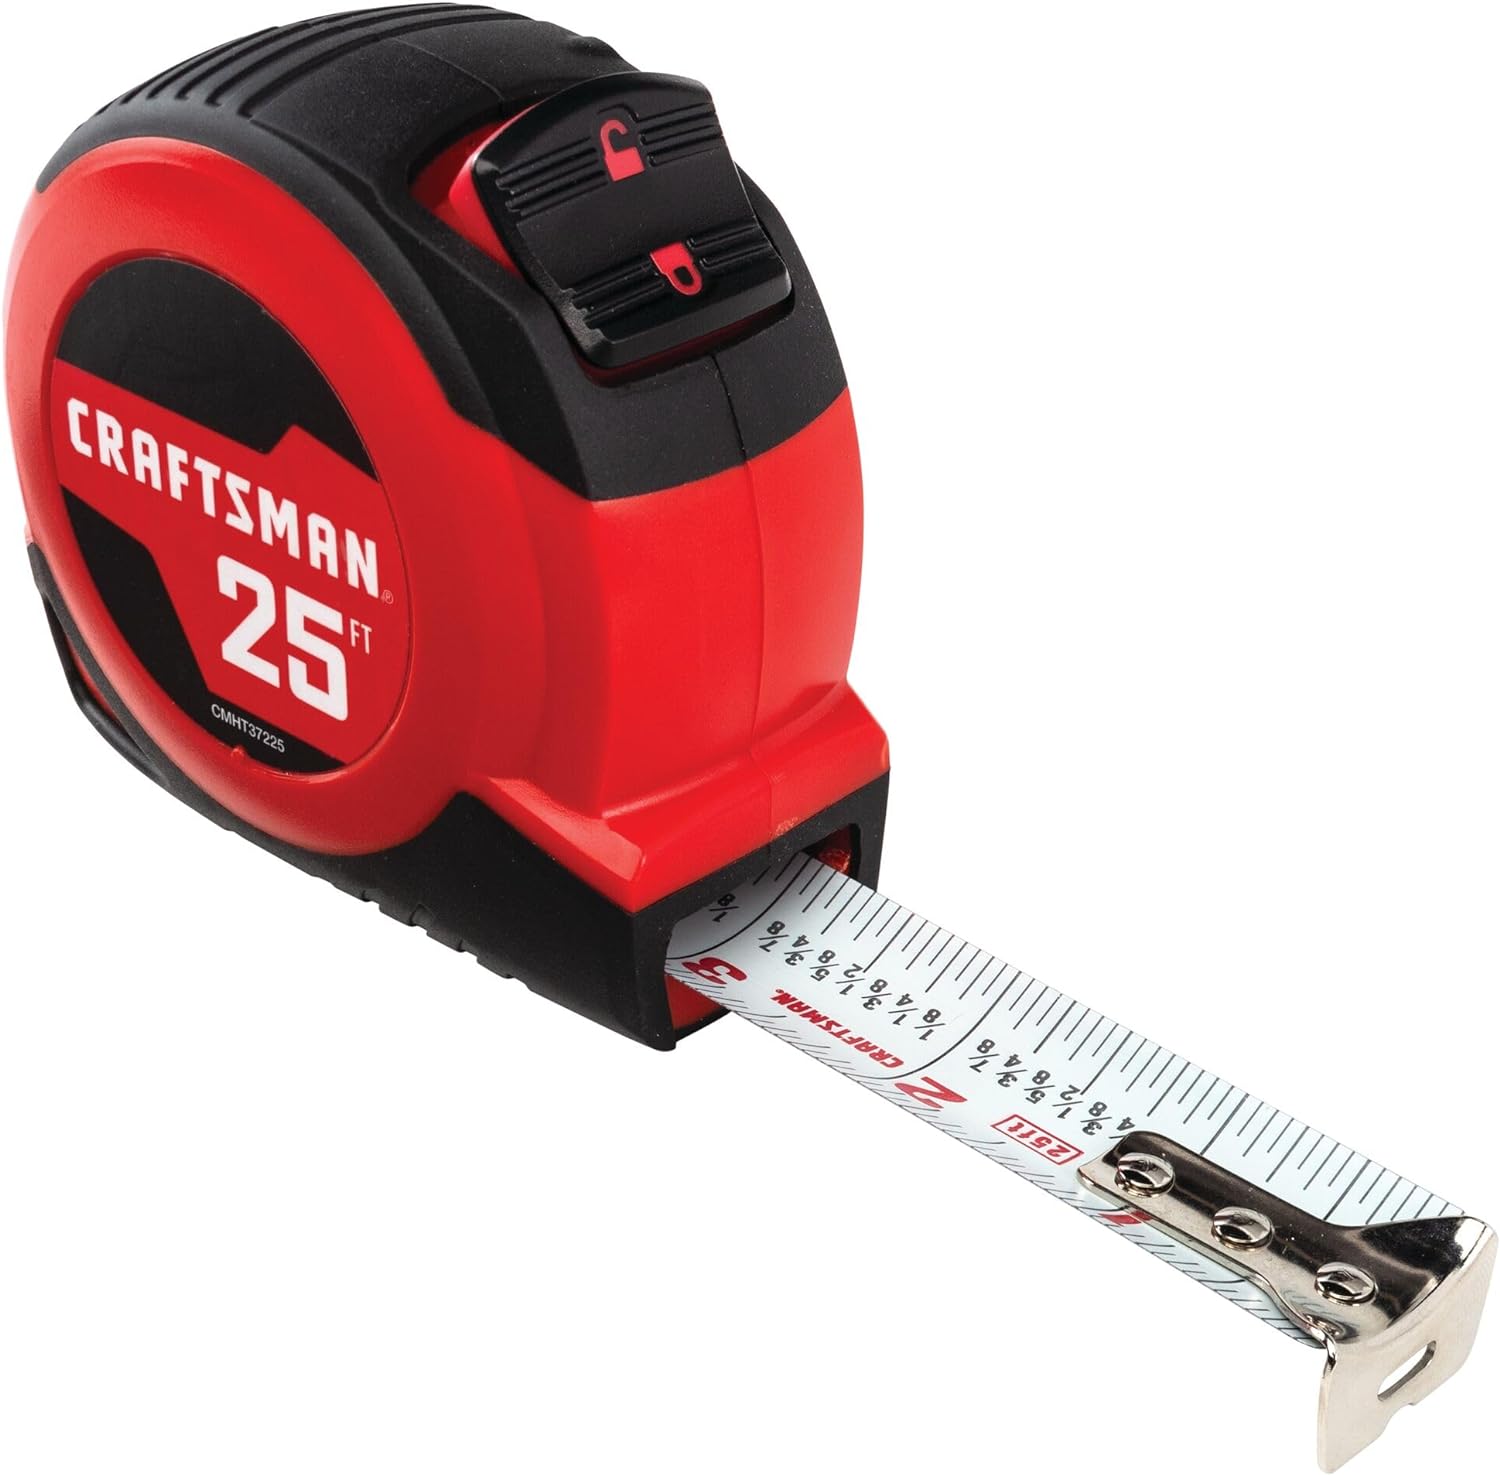
CRAFTSMAN 25-Ft Tape Measure
Check on AmazonKey Specs
- Fraction Markings on Blade for quick, hassle-free measurements
- Durable Construction for long-lasting performance
- Rubber Overmold Grip for added comfort and control
- 25-Foot Length to accommodate a variety of tasks
The CRAFTSMAN 25-Ft Tape Measure delivers quick, accurate measurements with user-friendly features for both professionals and DIY enthusiasts. Designed with fractions printed on the blade, it allows for easy reading and precision. The rubber overmold ensures a secure grip, preventing slips and enhancing durability for job site or home use.iasts alike.
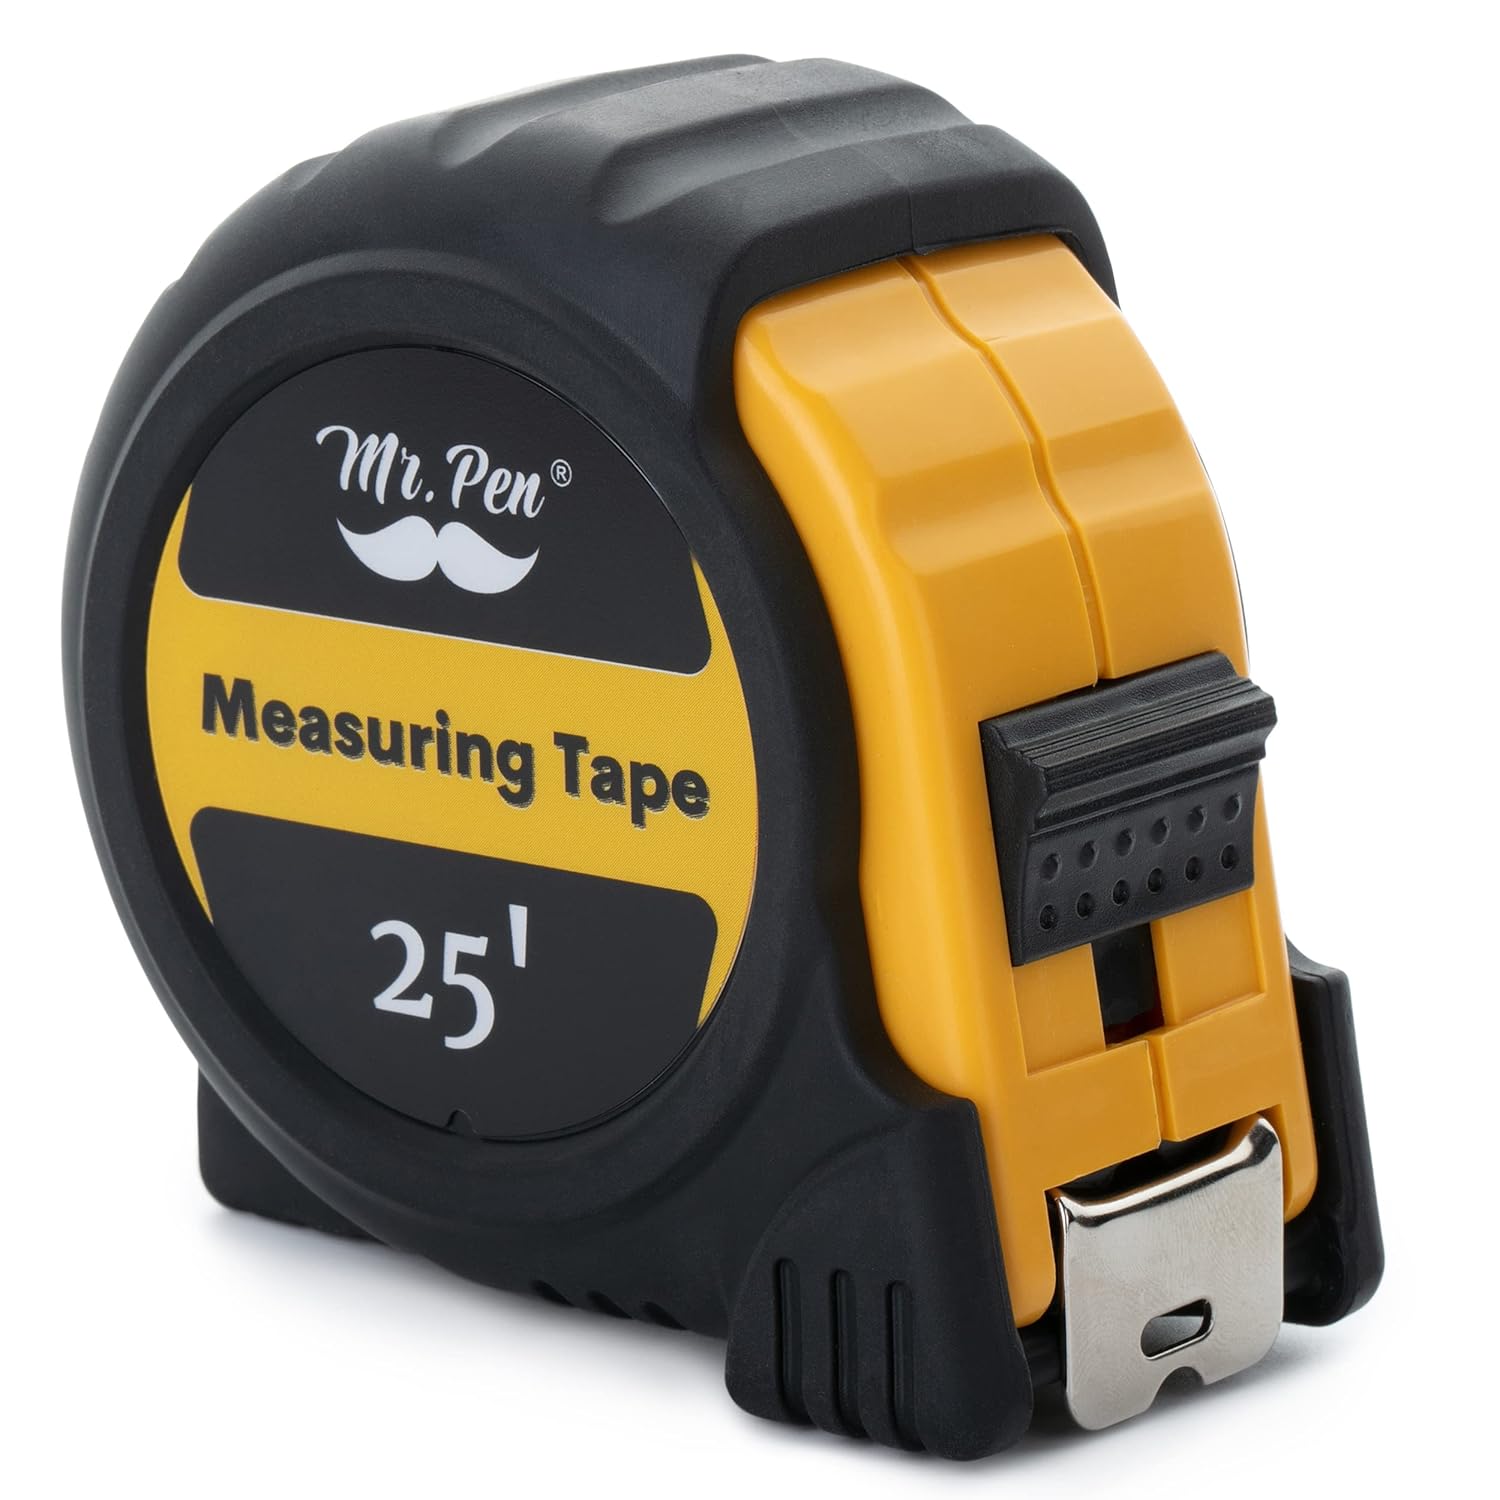
Mr. Pen- Tape Measure
Check on Amazon
Key Specs:
- 25-Foot Blade – Includes both metric (cm, mm) and imperial (inch) markings for precise measurements
- Durable Rubberized Casing – Shock-absorbent design enhances longevity and impact resistance
- Hook Slot for Secure Measuring – Easily latches onto nails or screws for stability
- Thumb Lock Mechanism – Allows controlled extension and retraction of the blade
- Compact & Portable – Features a built-in belt clip for easy carrying
Mr. Pen 25-Foot Tape Measure is a versatile and durable measuring tool designed for professionals and DIY enthusiasts. The 25-foot blade features both metric and imperial units, ensuring precise measurements for woodworking, construction, and home improvement projects. The shock-absorbent rubberized casing enhances durability, while the hook slot and thumb lock provide stability and control.
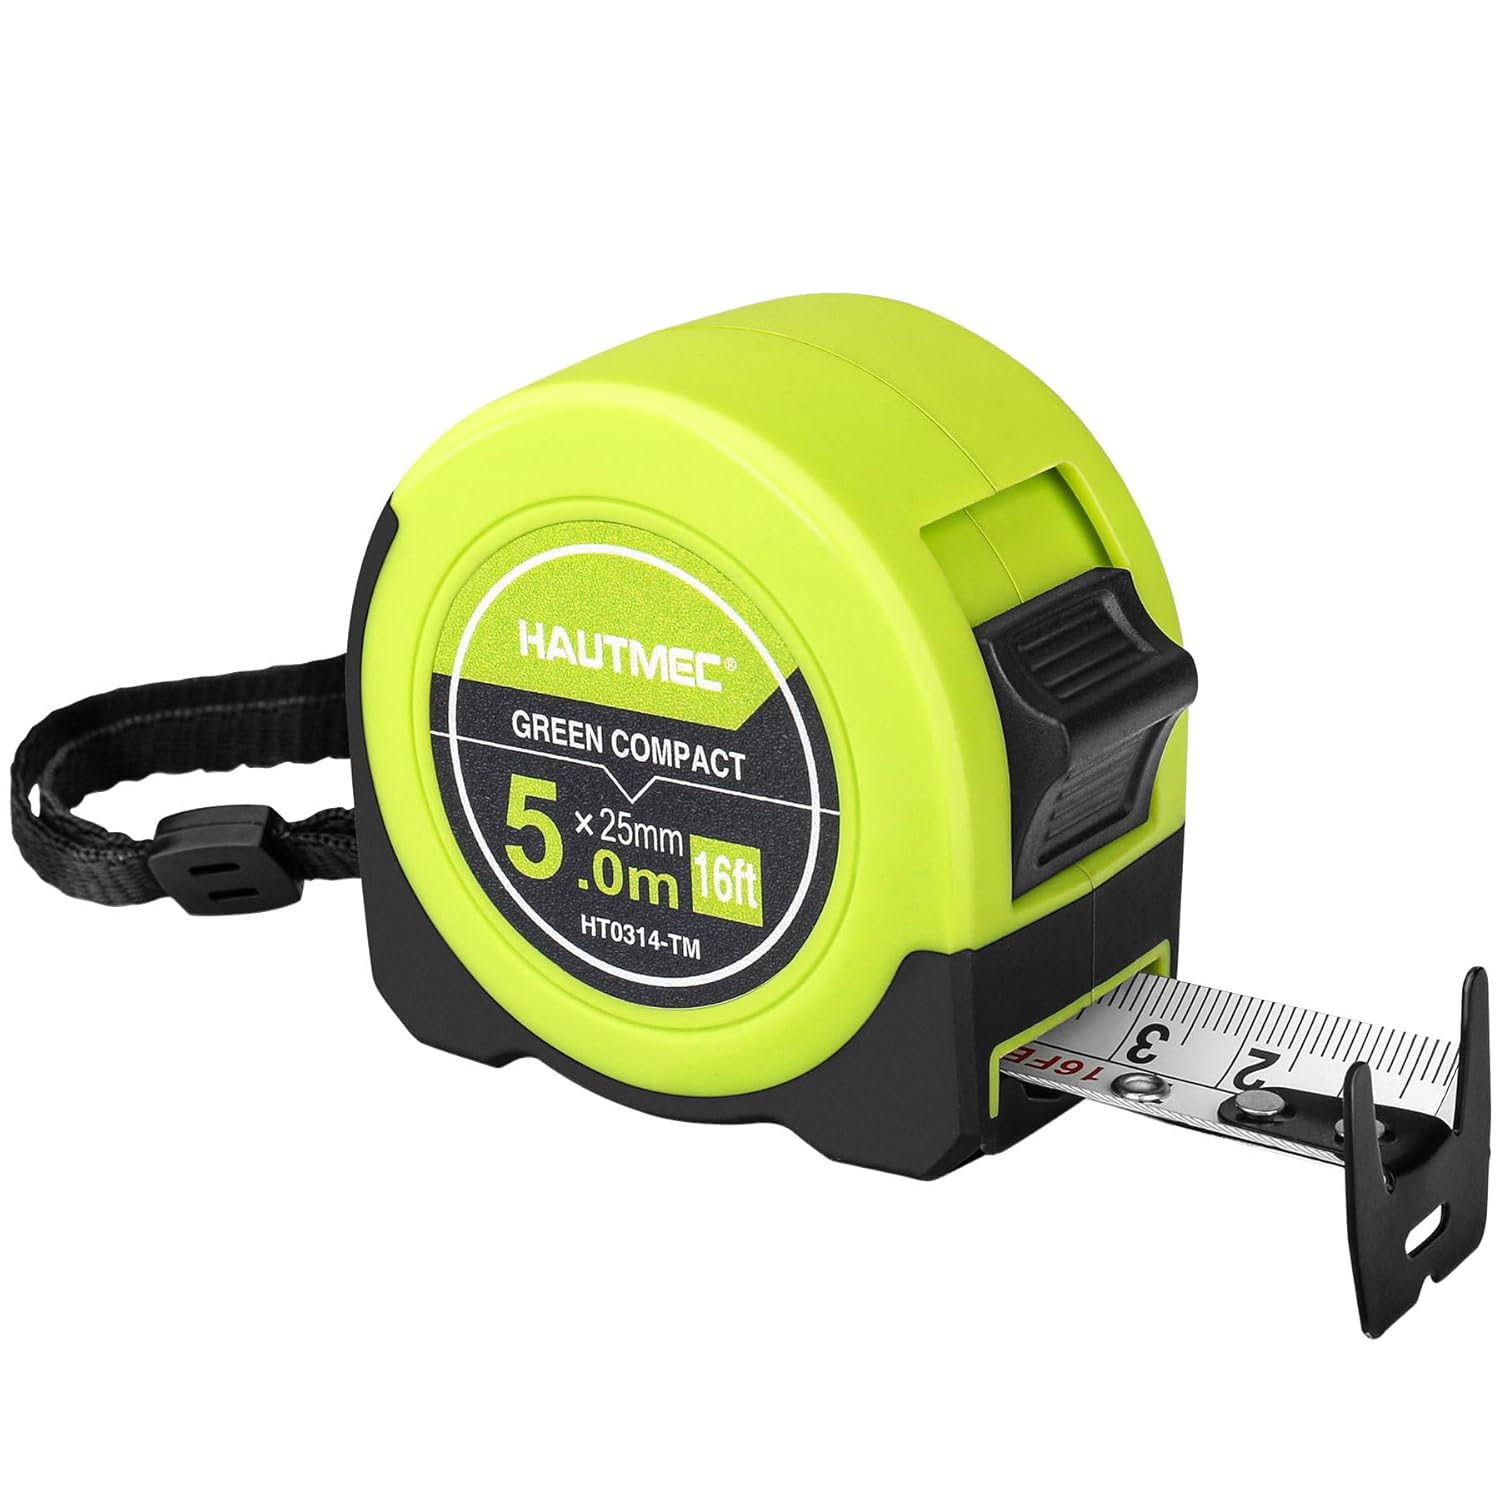
HAUTMEC Pro Tape Measure
Check on AmazonKey Specs:
- Thickened 25mm blade for durability
- Dual-sided scale (metric/imperial)
- Impact-resistant ABS casing
- Compact, easy-to-carry design
- Ideal for both professionals and DIYers
The ZYLOQUEX Foldable Workbench offers a space-saving solution with a foldable design that opens and closes in just 3 seconds. Weighing only 23 lbs but supporting up to 1,000 lbs, it provides stability and strength for heavy-duty tasks. Made with a durable, waterproof table top, it’s easy to clean and built to last. The versatile clamping system, with multi-functional holes and X-shaped grooves, ensures precise measurements and effortless clamping for various projects.
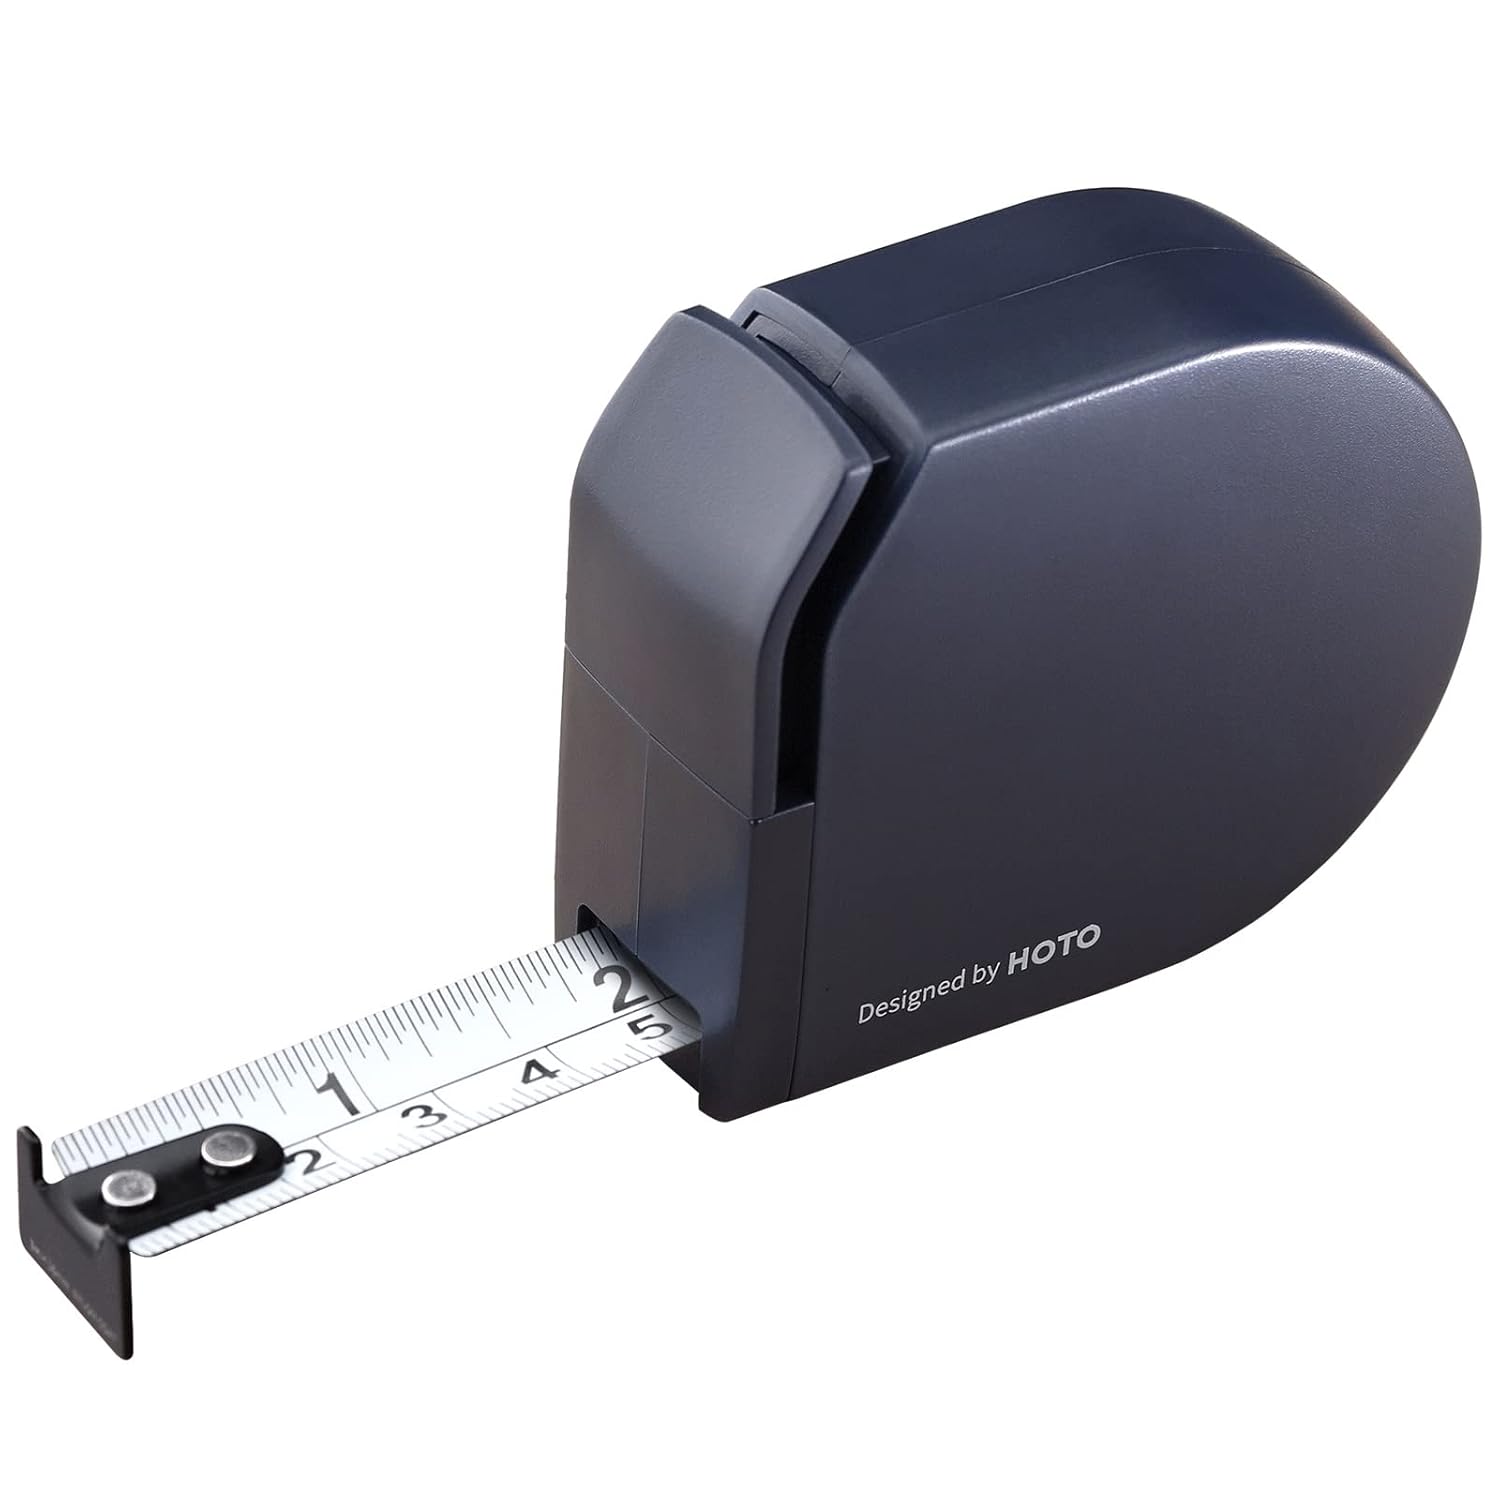
HOTO Self Lock Tape Measure
Check on AmazonKey Specs:
- Self-locking mechanism for precise measurements
- Press-to-retract feature for smooth and controlled blade retraction
- Durable, corrosion-resistant nylon-coated blade
- Lightweight, impact-resistant ABS case
- Safe, non-sharp edges for added protection
The HOTO Self-Lock Tape Measure combines innovative design with high functionality. I appreciate how effortlessly the self-locking mechanism works, ensuring smooth operation without unnecessary slips. The retracting blade system is smooth yet controlled, preventing any damage while retracting. Its precision and flexible design offer accurate readings, making it ideal for various tasks. Here’s why I think it stands out:
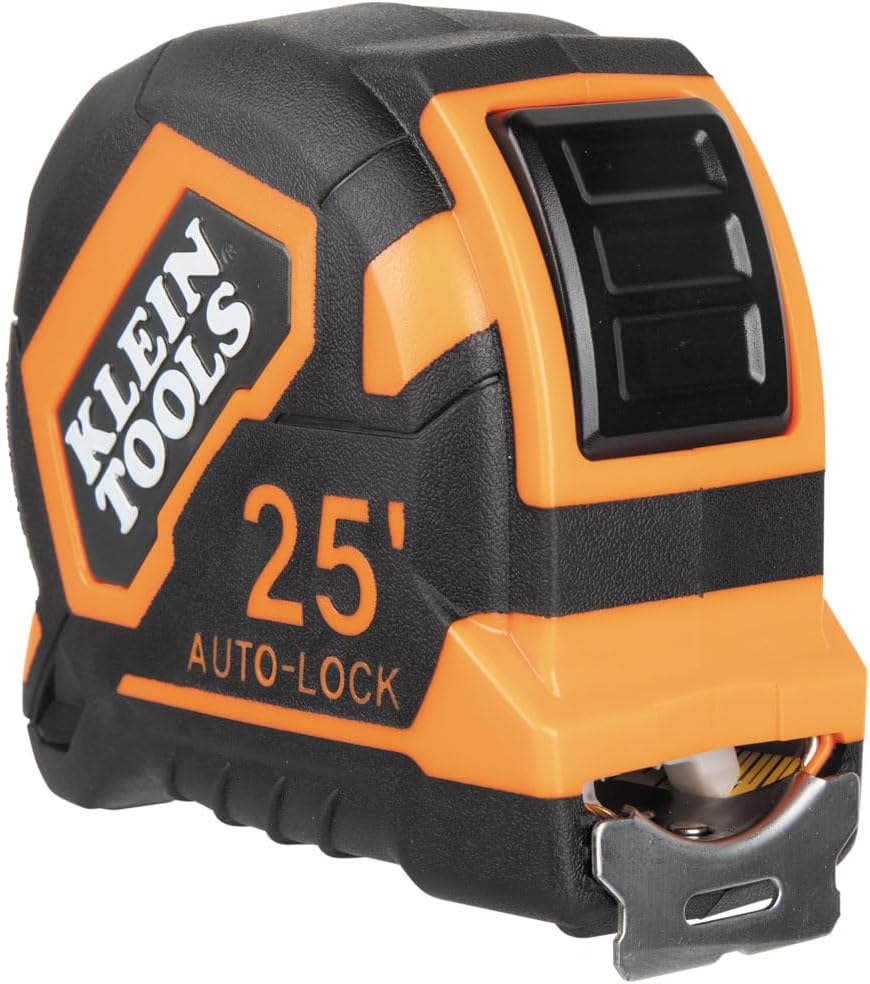
Klein Tools 9125AL Tape Measure
Check on AmazonKey Specs:
- Auto-lock for hands-free blade control
- 16-foot reach with a wide, durable blade
- Bold, easy-to-read markings every 1/8-inch
- Impact-resistant, over-molded housing for excellent grip
- Metal belt-clip and tether hole for easy portability
The Klein Tools 9125AL Tape Measure is built for tough job sites, offering both convenience and durability. I love how the auto-lock feature keeps the blade securely in place, making measurements easier and faster. Its 16-foot reach and heavy-duty nylon coating ensure long-lasting use, while the bold markings make it easy to read. Here’s why I recommend it:
The Art of Accurate Measurements: Mastering the Tape Measure
Have you ever embarked on a DIY project only to realize that your measurements were off, leading to frustration and wasted materials? Using a tape measure accurately is a fundamental skill in various fields, from construction to crafting. It ensures precision and saves you time and resources. However, many people unknowingly make common mistakes when using a tape measure, resulting in inaccurate readings. Let’s delve into these blunders and explore how to avoid them for precise measurements every time.
Not Starting at the Beginning of the Tape Measure
When it comes to using a tape measure, starting at the 1-inch mark is crucial for accurate measurements. The metal tang, or hook, at the end of the tape is designed to compensate for its thickness, ensuring precise readings. Ignoring this starting point can lead to discrepancies in your measurements. To guarantee accuracy from the get-go, always align the hook with the edge of the object you’re measuring.
Here are some tips to ensure accurate measurements from the start:
1. **Press the hook firmly**: Make sure the hook is securely positioned against the edge of the object to eliminate gaps that can skew measurements.
2. **Account for the hook’s thickness**: The hook adds a specific measurement to your reading. For most tape measures, this is 1 inch. Adjust your starting point accordingly.
3. **Double-check your alignment**: Before recording any measurements, verify that the hook is flush against the edge to prevent errors.
| Tips for Accurate Measurements |
|——————————–|
| 1. Start at the 1-inch mark |
| 2. Press the hook firmly |
| 3. Account for the hook’s thickness |
| 4. Double-check alignment |
## Ignoring the Hook When Measuring
The hook at the end of a tape measure is not just for show; it plays a vital role in ensuring accurate measurements. By disregarding the hook and starting from the wrong end, you risk introducing errors into your readings. Properly utilizing the hook can make a significant difference in the precision of your measurements.
To make the most of the hook for precise results, consider the following techniques:
1. **Use the hook as a reference point**: Align the hook with the edge of the object to establish a consistent starting position for your measurements.
2. **Factor in the hook’s length**: Remember to include the length of the hook in your measurements to obtain the true size of the object.
3. **Avoid bending the tape**: Keep the tape measure straight when using the hook to maintain accuracy throughout the measuring process.
## Measuring from the Wrong Side of the Tape
One common mistake people make when using a tape measure is measuring from the wrong side. Tape measures typically have markings on both the top and bottom edges, with the measurements running in opposite directions. If you inadvertently read from the wrong side, your measurements will be inaccurate.
To ensure measurements are taken from the correct side, follow these strategies:
1. **Identify the correct edge**: Pay attention to the side of the tape measure where the measurements are displayed to avoid confusion.
2. **Align the tape properly**: Position the tape measure so that the correct side is facing the object you’re measuring to obtain precise readings.
3. **Double-check your reading**: Before recording any measurements, confirm that you are reading from the correct side to prevent errors.
Stay tuned for more tips on mastering the art of using a tape measure accurately!
Pulling the Tape Measure Too Tight or Too Loose
The tension at which you pull a tape measure can significantly impact the accuracy of your measurements. Pulling it too tight can cause the tape to bow, leading to exaggerated readings, while pulling it too loosely can result in measurements that are shorter than the actual size. Maintaining consistent tension is key to obtaining precise measurements every time.
Here are some guidelines for achieving the right tension while measuring:
1. **Apply gentle pressure**: Pull the tape measure taut enough to eliminate any slack but not so tight that it distorts the measurement.
2. **Avoid stretching the tape**: Refrain from yanking the tape measure excessively, as this can cause inaccuracies in your readings.
3. **Practice a steady hand**: Keep a steady grip on the tape measure to ensure a consistent level of tension throughout the measuring process.
Stay tuned for more insights on common tape measure mistakes and how to avoid them!
Misreading Measurements Due to Parallax Error
Parallax error occurs when the angle from which you view a measurement scale affects your perception of the reading. This optical illusion can lead to inaccuracies in your measurements if not accounted for. To avoid misreading measurements due to parallax error, it’s essential to understand its impact and implement strategies to mitigate its effects.
To steer clear of parallax error when reading measurements, consider the following tips:
1. **View the scale straight on**: Position yourself directly in front of the measurement scale to minimize the distortion caused by viewing it at an angle.
2. **Align your line of sight**: Ensure that your line of sight is perpendicular to the measurement scale to obtain an accurate reading.
3. **Use a magnifying glass**: For small or detailed measurements, a magnifying glass can help you discern markings more precisely and reduce the risk of parallax error.
Stay tuned for more expert advice on mastering the art of using a tape measure accurately!
Using a Worn-Out or Damaged Tape Measure
Using a worn-out or damaged tape measure can compromise the accuracy of your measurements. Over time, the markings on the tape may fade, the tape itself may stretch or warp, and the locking mechanism may become unreliable. To ensure precise measurements, it’s crucial to regularly inspect your tape measure for signs of wear and tear and replace it when necessary.
The consequences of using a faulty tape measure can include:
1. **Inaccurate measurements**: Worn-out tapes may have stretched sections that provide incorrect readings.
2. **Safety hazards**: A damaged tape measure with a broken locking mechanism can pose safety risks during use.
3. **Project delays**: Relying on an unreliable tape measure can lead to errors that require rework, causing delays in your projects.
To maintain the accuracy and reliability of your measurements, make it a habit to inspect your tape measure regularly and invest in a new one if needed.
Failing to Account for the Tape Measure’s Width
The width of a tape measure can impact the accuracy of your measurements, especially when measuring tight spaces or inside dimensions. Ignoring the width of the tape can lead to readings that are slightly off the mark. To compensate for the tape measure’s width and obtain precise measurements, it’s essential to factor this dimension into your readings.
Here are some techniques for compensating for the tape measure’s width in measurements:
1. **Offset the measurement**: If measuring inside dimensions, subtract the width of the tape measure from your reading to account for the space taken up by the tape.
2. **Use the edge of the tape**: Align the edge of the tape measure with the starting point of your measurement to ensure accurate readings.
3. **Be consistent**: Whether measuring with the tape’s body or the edge, maintain consistency in your approach to avoid discrepancies in your measurements.
Stay tuned for more valuable tips on avoiding common tape measure mistakes!
Measuring Without Considering the End Markings
The end markings on a tape measure serve as reference points for accurate measurements. Ignoring these markings or failing to incorporate them into your readings can result in errors and inconsistencies. Paying attention to the end markings and utilizing them effectively can enhance the precision of your measurements.
To ensure you’re making the most of the end markings for accurate measurements, consider the following strategies:
1. **Use the end markings as starting points**: Begin your measurements from the end markings to establish a consistent reference for your readings.
2. **Factor in the end markings in calculations**: Include the measurements indicated by the end markings in your overall calculations for precise results.
3. **Verify alignment**: Before recording any measurements, double-check that the end markings are aligned correctly to avoid inaccuracies.
Stay tuned for more expert advice on mastering the art of using a tape measure accurately!
Not Double-Checking Measurements for Accuracy
Verifying your measurements is a crucial step in ensuring precision and avoiding costly mistakes. Failing to double-check your readings can lead to errors that may go unnoticed until it’s too late. By incorporating a simple verification process into your measuring routine, you can catch inaccuracies early on and make necessary adjustments.
The significance of verifying measurements for precision includes:
1. **Error prevention**: Double-checking measurements helps catch any mistakes before they impact your project or task.
2. **Confidence in accuracy**: By confirming your readings, you can proceed with confidence knowing that your measurements are precise.
3. **Professionalism**: Taking the time to double-check measurements demonstrates attention to detail and a commitment to quality work.
To avoid errors and ensure the accuracy of your measurements, make it a habit to double-check your readings before finalizing any dimensions.
Overlooking Environmental Factors That Can Affect Measurements
Environmental factors can have a significant impact on the accuracy of your measurements. Changes in temperature, humidity, or lighting conditions can alter the dimensions of materials, affecting the readings you take with a tape measure. Being aware of these influences and taking precautionary measures can help mitigate their effects on your measurements.
Examples of environmental factors that can impact measurements include:
1. **Temperature fluctuations**: Extreme heat or cold can cause materials to expand or contract, leading to inaccurate measurements.
2. **Humidity levels**: High humidity can warp wood or metal surfaces, affecting the dimensions you measure.
3. **Poor lighting**: Inadequate lighting can make it challenging to read measurements accurately, especially in dimly lit areas.
To account for environmental influences on your measurements, try to work in stable conditions and make adjustments as needed to compensate for any changes.
Misinterpreting Fractions or Decimals on the Tape Measure
Interpreting fractions or decimals on a tape measure accurately can be challenging, especially if you’re not familiar with fractional or decimal measurements. Misreading these markings can lead to errors in your measurements, impacting the outcome of your projects. Understanding how to read and use fractions or decimals on a tape measure is essential for obtaining precise results.
To correctly interpret fractions or decimals on a tape measure, consider the following techniques:
1. **Learn the basics**: Familiarize yourself with common fractions and decimals used in construction and crafting to improve your measurement accuracy.
2. **Use conversion charts**: Keep handy reference guides or conversion charts to help you translate fractions or decimals into standard measurements.
3. **Practice measuring**: The more you practice using fractions and decimals on a tape measure, the more comfortable and proficient you’ll become in reading them accurately.
Stay tuned for more valuable insights on mastering the art of using a tape measure accurately!
Using a Tape Measure Inappropriately for Certain Tasks
While a tape measure is a versatile tool for measuring lengths and dimensions, there are instances where it may not be the best tool for the job. Certain tasks or materials may require specialized measuring tools or techniques to ensure accurate readings. Knowing when to use alternative tools can help you achieve more precise results in your projects.
Instances where a tape measure may not be the best tool for the job include:
1. **Measuring curves or irregular shapes**: Flexible measuring tapes or contour gauges are better suited for capturing the dimensions of curved or irregular surfaces.
2. **Measuring long distances**: For measuring long distances, a laser measure or measuring wheel may provide more accurate and efficient results.
3. **Measuring depths**: Calipers or depth gauges are ideal for measuring depths accurately, especially in confined spaces.
By recognizing when a tape measure may not be the most effective tool and exploring alternative measuring methods, you can enhance the accuracy of your measurements in various scenarios.
Not Storing the Tape Measure Properly
Improper storage of a tape measure can lead to damage, affecting its accuracy and longevity. Tossing it haphazardly in a toolbox or leaving it exposed to harsh elements can cause the tape to kink, stretch, or deteriorate over time. To maintain the quality and reliability of your tape measure, it’s essential to store it properly when not in use.
The risks of improper storage on the accuracy and longevity of a tape measure include:
1. **Tape distortion**: Storing the tape measure in a coiled or twisted position can cause it to retain a curved shape, leading to inaccurate measurements.
2. **Exposure to moisture**: Moisture can cause the tape to rust or corrode, affecting its functionality and readability.
3. **Impact damage**: Rough handling or storing the tape measure with heavy tools can result in dents or dings that compromise its accuracy.
To preserve the accuracy and lifespan of your tape measure, store it in a dry, protected environment and handle it with care to prevent unnecessary wear and tear.
Conclusion
In conclusion, mastering the art of using a tape measure accurately is essential for achieving precise measurements in various projects and tasks. By avoiding common mistakes such as starting at the wrong point, ignoring the hook, or failing to double-check measurements, you can enhance the quality of your work and save time and resources. Remember to consider environmental factors, interpret measurements correctly, and store your tape measure properly to maintain its accuracy and longevity. With these tips and strategies in mind, you can elevate your measuring skills and tackle projects with confidence and precision.
Remember, practice makes perfect when it comes to using a tape measure effectively. So, keep honing your skills and applying these best practices to ensure accurate measurements every time!
—
How do I know if my tape measure is accurate?
To verify the accuracy of your tape measure, you can perform a simple test by measuring a known distance, such as the width of a standard piece of lumber or a pre-marked measuring tool. If the measurement matches the expected value, your tape measure is likely accurate. Additionally, you can compare measurements taken with multiple tape measures to ensure consistency and reliability.
Can I use a tape measure for measuring angles?
While tape measures are primarily designed for linear measurements, you can use them in conjunction with other tools to estimate angles. For example, by measuring the lengths of two sides of a triangle, you can calculate the angle between them using trigonometric functions. However, for precise angle measurements, specialized tools like protractors or angle finders are recommended.
What should I do if my tape measure becomes kinked or twisted?
If your tape measure becomes kinked or twisted, it’s essential to straighten it out carefully to prevent permanent damage. Gently uncoil the tape and run it through your hands to smooth out any kinks. Avoid pulling or yanking on the tape, as this can cause further distortion. Once the tape is straightened, store it properly to maintain its shape and accuracy.