Are you ready to take your woodworking projects to the next level? Palm sanders are a handy tool that can help you achieve a smooth and professional finish on your surfaces. These compact and easy-to-use sanders are perfect for DIY enthusiasts and professionals alike. Whether you’re refinishing furniture, smoothing out rough edges, or preparing surfaces for painting, a palm sander can be your best friend in the workshop.
Our Top Palm Sander Picks

Makita BO5030K 5″ Random Orbit Sander
Check on AmazonKey Specs:
- Motor: 3.0 AMP
- Orbit Action: 1/8″
- Speed: 12,000 OPM
- Dust Collection: Through-the-pad system
- Includes: Dust bag, abrasive discs, and tool case
The Makita BO5030K 5″ Random Orbit Sander stands out with its 3.0 AMP motor delivering 12,000 OPM for smooth, fast sanding. The 1/8″ random orbit action ensures an ultra-smooth finish with minimal swirl marks. The ergonomically designed rubberized grip enhances comfort and control, especially during extended use. I appreciate the pad control system for smooth start-ups, and the efficient dust collection system helps keep my workspace clean. It’s a reliable tool for both professionals and DIYers.

DEWALT DWE6421 Orbital Sander
Check on AmazonKey Specs:
- Motor: 3.0 AMP
- Orbit Speed: 12,000 OPM
- Design: Shorter height for better control
- Dust Collection: Improved system, one-handed locking bag
- Includes: Sander, dust bag
The DEWALT DWE6421 5-Inch Orbital Sander is a powerhouse for sanding with its 3.0-amp motor that delivers a smooth 12,000 OPM. Its shorter height design lets me get closer to the work surface for greater control. The separate counterweight and rubber over-molded grip make it comfortable to use for long periods with minimal vibration. The improved dust collection system and dust-sealed switch ensure a cleaner workspace and longer tool life, making it a reliable choice for professionals.
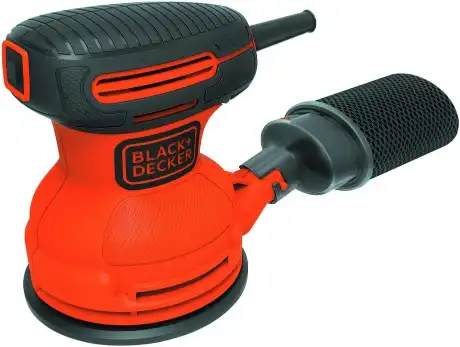
BLACK+DECKER BDERO100 Orbital Sander
Check on AmazonKey Specs:
- Motor: 2.0 Amp
- Orbit Speed: 12,000 OPM
- Design: Lightweight and compact
- Dust Collection: Built-in dust bag
- Includes: Sandpaper sheet, dust bag
The BLACK+DECKER BDERO100 5-Inch Random Orbit Sander is an efficient, lightweight tool that delivers a swirl-free finish. The 2.0 Amp motor pushes the sander to 12,000 OPM, making it ideal for sanding, smoothing, and paint removal. I love how its compact size fits into tight spaces, and the dust collection system keeps my workspace clean. The comfort grip handle reduces fatigue, and the hook-and-loop sandpaper attachment makes changing sheets a breeze. A solid, easy-to-use sander for light to moderate tasks.

DEWALT DCW200B 20V MAX XR Brushless Cordless 1/4 Sheet Variable Speed Sander
Check on AmazonKey Specs:
- Motor: Brushless
- Speed: 8,000 – 14,000 OPM
- Power Source: 20V Battery (sold separately)
- Design: Low profile for precision
- Included: Dust bag, hole punch, short dust chute
The DEWALT DCW200B 20V MAX XR Brushless Cordless Sander is an excellent tool for anyone seeking power and precision. Its brushless motor ensures longer runtime and efficiency, making it ideal for extended sanding tasks. The variable speed control (8,000-14,000 OPM) gives you full control over the sanding process, while the low-profile design allows you to get close to the surface for precise work. The dust-sealed switch and textured rubber grip enhance durability and comfort. It’s a solid cordless option for professional sanding needs.

BOSCH ROS20VSC Palm Sander
Check on AmazonKey Specs:
- Motor: 2.5 Amp
- Speed: 7,500-12,000 OPM
- Dust Collection: Microfilter system
- Design: Soft-grip handle with multiple positions
- Included: Sanding pad, sanding disc, carrying bag, dust canister, vacuum adapter
The BOSCH ROS20VSC Palm Sander is an excellent tool for those looking for precision and a flawless finish. The pad dampening system ensures no swirl marks on both flat and contoured surfaces. The variable speed control (7,500-12,000 OPM) lets you adapt to different tasks effortlessly. I particularly appreciate the microfilter dust canister, which traps fine dust down to 1/2-micron particles, keeping the workspace clean. The ergonomic design and soft-grip make it comfortable for extended use.
Choose the Right Grit Sandpaper
When it comes to sanding, the grit of your sandpaper plays a crucial role in the outcome of your project. Grit sizes determine how coarse or fine the sandpaper is, with lower numbers indicating coarser grits and higher numbers representing finer grits. It’s essential to start with a coarse grit to remove imperfections and then progress to finer grits for a smooth finish. For example, for rough sanding, you might start with 60-80 grit and then move to 120-150 grit for a finer finish.
| Grit Size | Usage |
|---|---|
| 60-80 | Rough sanding |
| 120-150 | Finer finish |
When selecting the appropriate grit for your project, consider the type of wood or material you are sanding, the level of imperfections you need to remove, and the desired smoothness of the final surface.
Sand in the Direction of the Grain
Wood grain refers to the natural pattern created by the alignment of wood fibers. Sanding with the grain means moving your sander in the same direction as these fibers, resulting in a smoother finish and preventing splintering or tear-out. On the other hand, sanding against the grain can lead to a rough surface and ruin the natural beauty of the wood.
- Always identify the direction of the grain before you start sanding.
- Use light pressure and let the sander do the work to avoid going against the grain.
- Remember to follow the grain even when switching to finer grits for a consistent finish.
How Sanding Against the Grain Can Affect the Finish
Sanding against the grain can cause the wood fibers to tear out, leaving a rough and uneven surface. This can be especially noticeable when applying a stain or finish, as the imperfections will be more pronounced. To achieve a professional result, always go with the grain and take your time to sand carefully.
Keep the Sander Moving
When using a palm sander, it’s essential to keep the tool in motion to prevent uneven sanding and overworking one spot. Different sanding patterns, such as back and forth or in circular motions, can help you cover the surface evenly and avoid creating dips or grooves.
- Avoid staying in one spot for too long to prevent over-sanding.
- Move the sander smoothly across the surface, overlapping each pass slightly.
- Change your sanding pattern periodically to ensure uniform sanding.
Tips for Maintaining a Consistent Sanding Motion
To maintain a consistent sanding motion, try to keep a steady pace and apply even pressure on the sander. If you notice any areas that require more attention, resist the urge to focus on them for too long. Instead, make multiple passes over the entire surface to achieve a uniform finish.
Use Proper Pressure
The amount of pressure you apply while sanding can significantly impact the result. Too much pressure can cause the sander to dig into the surface, leading to uneven sanding and potential damage. Conversely, too little pressure may result in ineffective sanding and prolong the process.
- Start with light to moderate pressure and adjust as needed based on the material and the level of imperfections.
- Let the sander’s weight guide the pressure rather than pressing down forcefully.
- Experiment with different pressure levels on scrap material to find the right balance.
Tips for Finding the Right Amount of Pressure for Different Surfaces
For softer woods, such as pine, you’ll want to use lighter pressure to avoid creating gouges or uneven surfaces. Hardwoods, like oak or maple, can withstand slightly more pressure but still require a gentle touch. Practice on a small area to determine the ideal pressure for your specific project.
Sanding Edges and Corners
While palm sanders are great for flat surfaces, they can pose a challenge when it comes to sanding edges and corners. These areas require a different approach to ensure a consistent finish and avoid rounding over sharp edges. Using the correct technique and the right attachments can help you tackle these hard-to-reach spots effectively.
- Use a detail sander or sanding block for precise sanding in corners and along edges.
- Hold the sander at a slight angle to prevent creating dips or uneven surfaces.
- Take your time and make gentle passes to avoid over-sanding the edges.
Tips for Effectively Sanding Hard-to-Reach Areas
When sanding edges and corners, be patient and work methodically to ensure a uniform finish. If necessary, switch to hand sanding with a sanding block or sandpaper to maintain control and prevent accidental damage to the surrounding areas. Remember, attention to detail is key when working on edges and corners.
Clean the Surface Before Sanding
Before you start sanding, it’s crucial to prepare the surface properly by cleaning off any dust, dirt, or debris. A clean surface not only ensures a smoother sanding process but also helps prevent scratches and imperfections caused by particles getting trapped under the sandpaper.
- Use a tack cloth or a vacuum to remove dust and debris from the surface.
- Inspect the area for any remaining residue or contaminants that could affect the finish.
- Allow the surface to dry completely before starting the sanding process.
Tips for Preparing the Surface Before Sanding
To achieve a flawless finish, take the time to clean and inspect the surface thoroughly. Any leftover residue can interfere with the sanding process and result in a less-than-perfect outcome. By starting with a clean slate, you set yourself up for success and a professional finish.
Check Your Progress Regularly
As you sand, it’s essential to inspect the surface regularly to identify any uneven areas, imperfections, or missed spots. Checking your progress allows you to make adjustments as needed and ensures a consistent finish throughout the project.
- Use a light source at different angles to reveal any flaws or rough patches.
- Run your hand gently over the sanded surface to feel for any inconsistencies.
- Address any issues immediately to prevent them from becoming more challenging to fix later on.
Tips for Ensuring a Consistent Finish Throughout the Project
By checking your progress regularly, you can catch any issues early on and make corrections before they become more significant problems. Don’t rush through the sanding process; take the time to assess the surface and make sure you’re on track to achieve the desired result.
Use a Sanding Block for Flat Surfaces
When working on flat surfaces, using a sanding block can help you maintain a consistent level and prevent uneven sanding. Sanding blocks provide stability and even pressure across the surface, resulting in a smoother finish compared to hand sanding alone.
- Choose a sanding block that matches the size and shape of the surface you’re working on.
- Wrap the sandpaper around the block and secure it in place for optimal sanding efficiency.
- Move the sanding block in straight lines or circular motions to cover the entire surface evenly.
Tips for Using a Sanding Block Effectively
For large flat surfaces, a sanding block can be a game-changer, providing stability and control while sanding. By incorporating a sanding block into your workflow, you can achieve a uniform finish and avoid dips or uneven spots that may occur with hand sanding alone.
Sand in Stages
Large projects can be daunting, especially when it comes to sanding. To make the process more manageable and ensure a consistent finish, consider breaking down the sanding into stages. By tackling one section at a time, you can focus on detail and quality without feeling overwhelmed.
- Divide the project into smaller sections that you can sand individually.
- Complete each stage before moving on to the next to maintain a systematic approach.
- Take breaks in between stages to prevent fatigue and maintain focus on the task at hand.
Tips for Tackling Large Projects in Manageable Sections
Don’t let the size of a project intimidate you. By breaking it down into stages, you can approach each part with precision and care, resulting in a more polished and professional outcome. Remember, patience and consistency are key when sanding in stages.
Avoid Over-sanding
While it’s essential to sand surfaces to achieve a smooth finish, over-sanding can be detrimental to your project. Excessive sanding can wear down the material, create dips or grooves, and compromise the integrity of the surface. Knowing when to stop is just as crucial as knowing where to start.
- Regularly check the surface for smoothness and imperfections to avoid unnecessary sanding.
- Follow a systematic approach and have a clear endpoint in mind for each sanding stage.
- Use finer grits sparingly to avoid removing more material than necessary.
Tips for Preventing Over-sanding
To prevent over-sanding, work methodically and purposefully, focusing on the areas that need attention without going overboard. By being mindful of your sanding technique and progress, you can achieve a professional finish without risking damage to the surface.
Use a Vacuum Attachment
When sanding, dust and debris can quickly accumulate, creating a messy work environment and affecting the quality of your finish. Using a vacuum attachment with your palm sander can help minimize dust and keep your workspace clean, allowing you to focus on the task at hand without interruptions.
- Attach a vacuum hose to your sander to collect dust as you work.
- Regularly empty the vacuum bag or canister to maintain optimal suction power.
- Wear a dust mask to protect yourself from inhaling fine particles during sanding.
Tips for Maintaining a Clean Work Environment
By incorporating a vacuum attachment into your sanding setup, you can create a cleaner and healthier workspace. Say goodbye to clouds of dust settling everywhere and hello to a more efficient and enjoyable sanding experience. Remember, a tidy workspace is a productive workspace.
Experiment with Different Techniques
Don’t be afraid to get creative with your sanding techniques. Trying out different approaches can help you discover new ways to achieve unique finishes and textures on your projects. Whether it’s experimenting with sanding patterns, angles, or pressure levels, expanding your sanding skills can lead to exciting results.
- Test different sanding motions, such as circular, back and forth, or figure-eight patterns.
- Explore the effects of varying pressure levels on different types of wood or materials.
- Combine hand sanding with palm sander techniques for a personalized touch.
Tips for Expanding Your Sanding Skills
Embrace the opportunity to try out new sanding techniques and see how they influence the final outcome of your projects. By stepping out of your comfort zone and experimenting with different approaches, you can refine your skills and develop a unique style that sets your work apart.
Practice Proper Safety Measures
While sanding may seem like a straightforward task, it’s essential to prioritize safety to prevent accidents and injuries. Wearing protective gear and following safety guidelines can ensure that you enjoy a safe and productive sanding experience every time.
- Wear safety goggles to protect your eyes from flying debris and dust particles.
- Use ear protection if your sander generates loud noise to prevent hearing damage.
- Avoid loose clothing and jewelry that could get caught in the sander’s moving parts.
Tips for Staying Safe While Using a Palm Sander
Protecting yourself during sanding is non-negotiable. By incorporating safety measures into your routine, you can focus on the task at hand without worrying about potential hazards. Remember, safety first, sanding second.
Conclusion
By following these palm sander tips, you can elevate your woodworking projects and achieve professional finishes that showcase your skills and attention to detail. Remember, practice makes perfect, so don’t be afraid to experiment and refine your sanding techniques to create stunning results every time.
Now, grab your palm sander, pick the right grit sandpaper, and get ready to transform your projects into works of art!
FAQ
Can I use a palm sander on metal surfaces?
While palm sanders are primarily designed for wood surfaces, some models can be used on metal with the appropriate sandpaper and technique. However, it’s essential to exercise caution and test on a small area first to ensure compatibility.
How often should I replace the sandpaper on my palm sander?
The frequency of sandpaper replacement depends on the type of project, the grit of the sandpaper, and the condition of the sandpaper. As a general rule, replace the sandpaper when it becomes clogged, worn, or ineffective in smoothing the surface.
Can I use a palm sander for removing paint or varnish from surfaces?
Yes, palm sanders can be used for removing paint or varnish from surfaces, but it’s essential to use the appropriate sandpaper grit and technique to avoid damaging the underlying material. Start with a coarse grit to remove the finish and progress to finer grits for a smooth surface.