The Ultimate Guide to Mortise and Tenon Joints: Avoiding Common Mistakes in Woodworking
The mortise and tenon joint is a time-honored woodworking technique known for its strength and durability. Often used in fine furniture making and cabinetry, this joint involves fitting a tenon (a protruding section of wood) into a mortise (a corresponding hole or slot) to create a tight, secure bond.
This traditional method has been relied upon for centuries, offering an incredibly strong connection that can withstand stress and wear. Mortise and tenon joints are commonly used in the construction of doors, windows, tables, and other high-quality wood structures. Depending on the project, different variations of the joint can be used, such as through, blind, or wedged tenons.
Mastering the mortise and tenon joint is a hallmark of skilled woodworking, ensuring both functionality and a beautiful, long-lasting finish in your creations.
Our Top Tenon Joints Picks
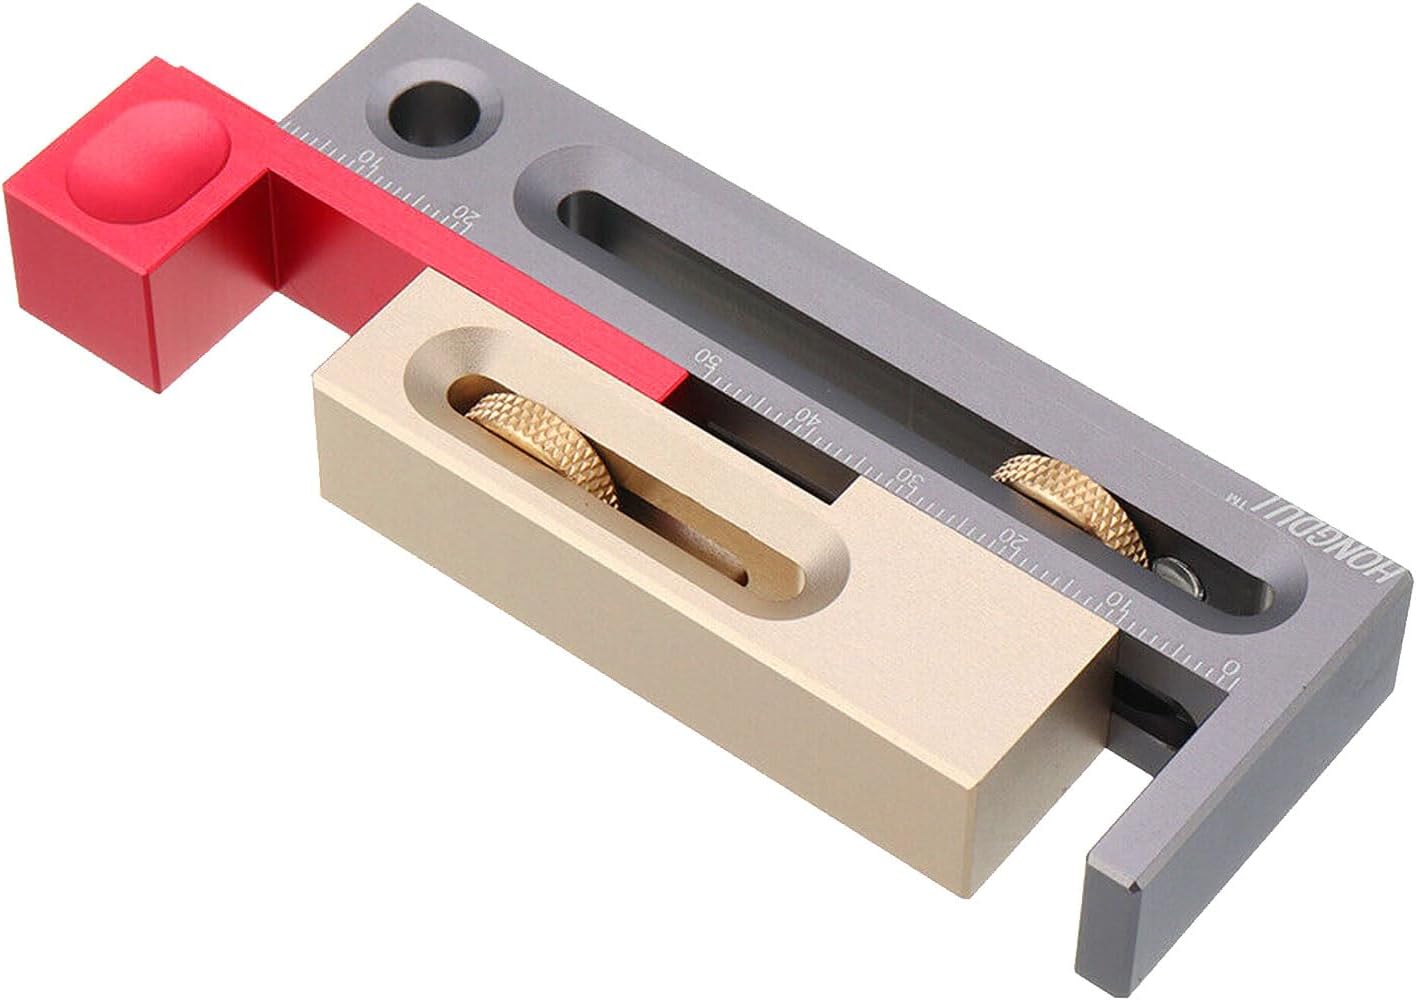
Table Saw Slot Adjuster Mortise and Tenon
Check on AmazonKey Specs
- Material: High-quality metal
- Application: Compatible with various saw types
- Features: Precise slot adjustments
- Durability: Wear-resistant and rust-resistant
- Efficiency: High precision for woodworking tasks
The Table Saw Slot Adjuster Mortise and Tenon is an essential tool for precise slot cutting. It’s easy to use, ensuring speed and accuracy in cutting grooves, and is widely applicable for wood structures, boxes, drawers, and more. Designed for various saw types, including table saws and miter saws, it ensures precise slot adjustments. Made from high-quality metal, it’s durable, rust-resistant, and offers long-lasting wear resistance for improved efficiency in woodworking.
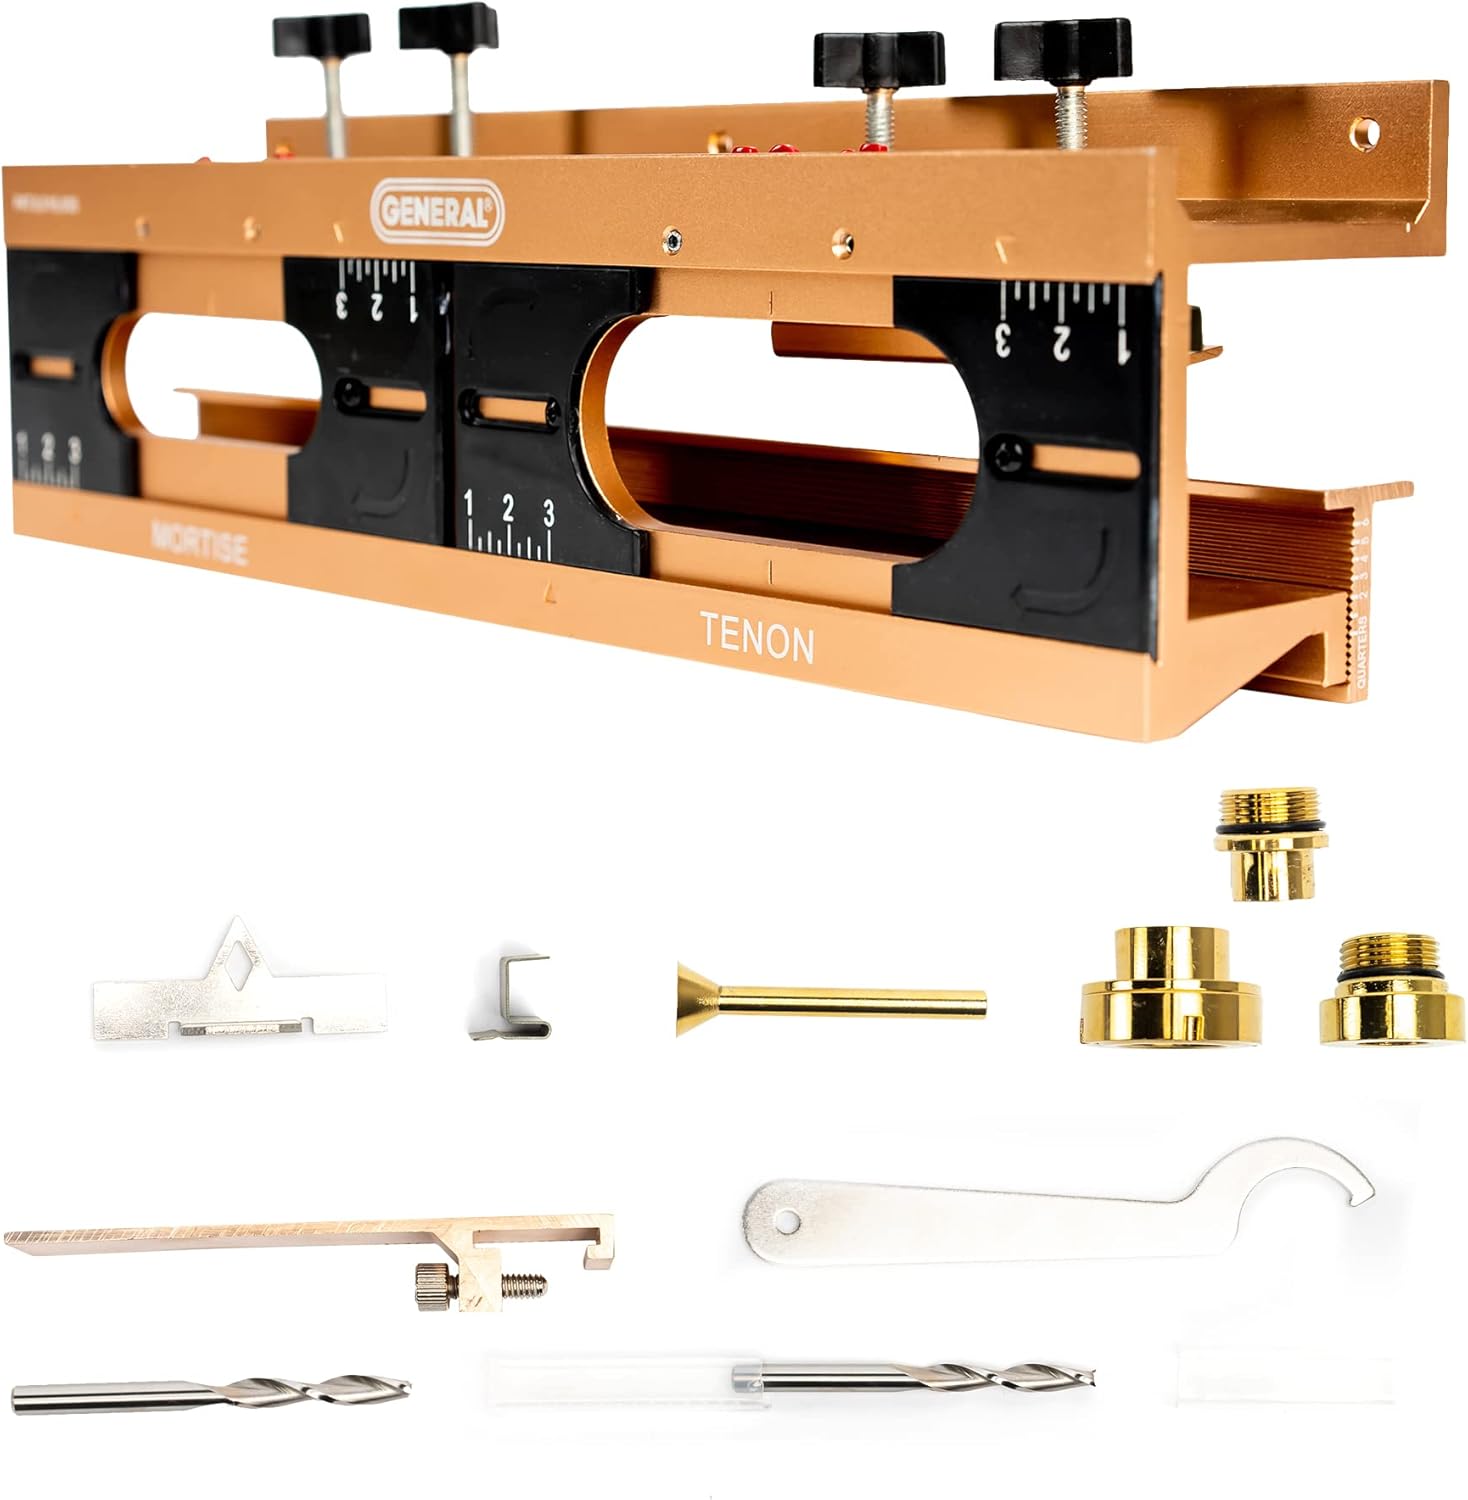
General Tools Mortise and Tenon Jig
Check on Amazon
Key Specs:
- Includes 1/4″ high-speed up-cut spiral bit
- Bushing guides for 1/4″, 3/8″, and 1/2″ tenons
- Adjustable base and centering tool
- Compatible with plunge routers
- Can be mounted on workbenches or boards
The General Tools Mortise and Tenon Jig is designed to help woodworkers create precise and durable joints. Featuring integrated clamps and swing arms, it allows easy alignment and secure wood placement for accurate cuts. Perfect for creating strong, stable mortise and tenon joints, this jig includes a high-speed spiral bit, bushing guides, centering tool, and an adjustable base for customized setup. It’s ideal for use with plunge routers and can be mounted to a workbench for optimal stability.
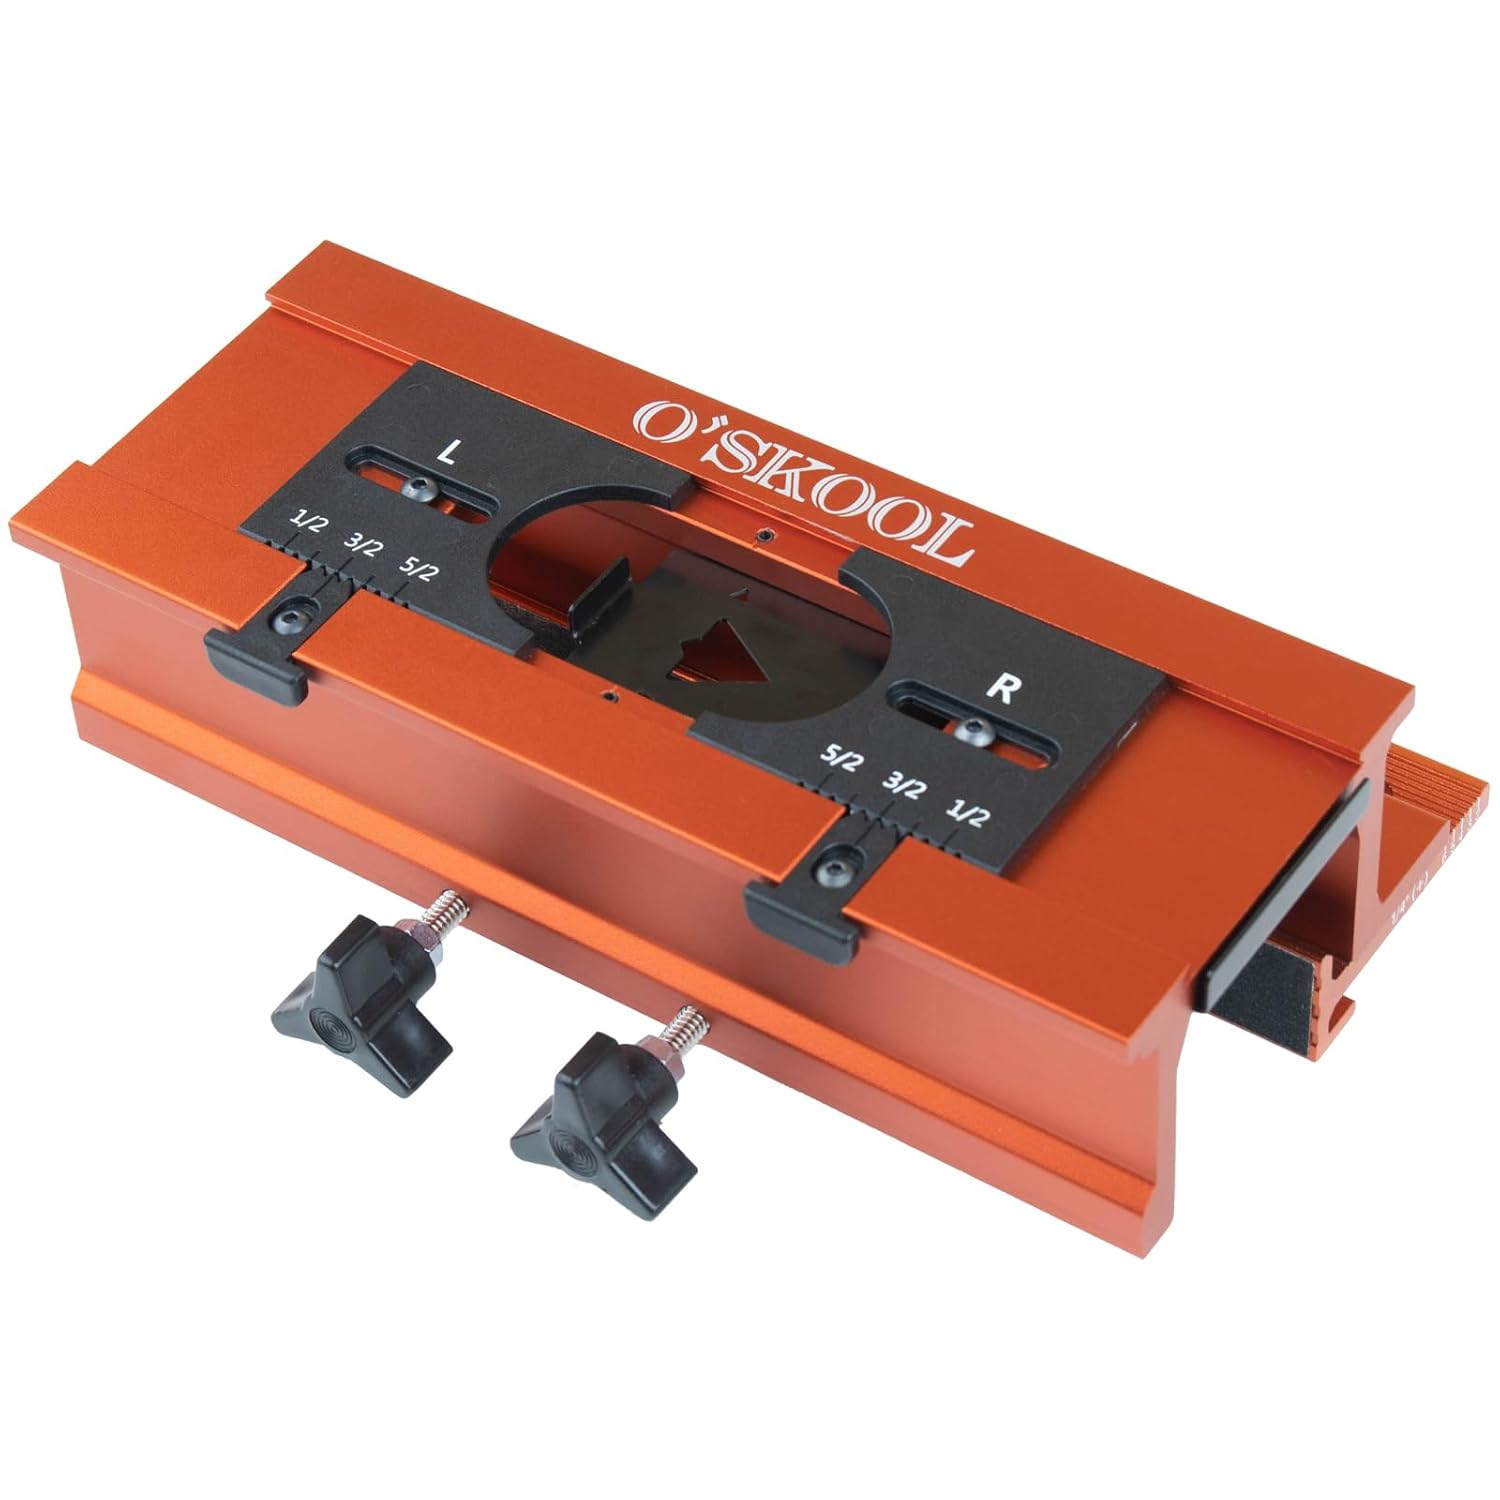
O’SKOOL Mortise and Tenon Jig is Ideal for cabinets
Check on AmazonKey Specs:
- Item Weight: 2.1 kg
- Cutting Diameter: 0.25 inches
- Material: High-Speed Steel
- Adjustable for 1/4″, 3/8″, or 1/2″ tenons
- Suitable for stock thickness: 1/2″ to 1-1/2″
- Includes: Mortise and Tenon Jig, router bit, bushing guides, hex wrench, lock nut, and sandpaper
- Ideal for cabinetry, furniture, and structural framing
The O’SKOOL Mortise and Tenon Jig is an excellent tool for creating precise, aligned mortises and tenons, particularly useful for cabinetry and woodworking projects. This jig comes with all the necessary components, including a 1/4-inch router bit, bushing guides for various tenon sizes, and self-adhesive sandpaper for smooth finishes. It allows users to cut joints ranging from 3/4″ to 3-1/8″ long and 1/4″, 3/8″, or 1/2″ wide, for stock thicknesses from 1/2″ to 1-1/2″. The jig guarantees consistent results, making it perfect for repetitive work on projects like cabinets, tables, and chairs.
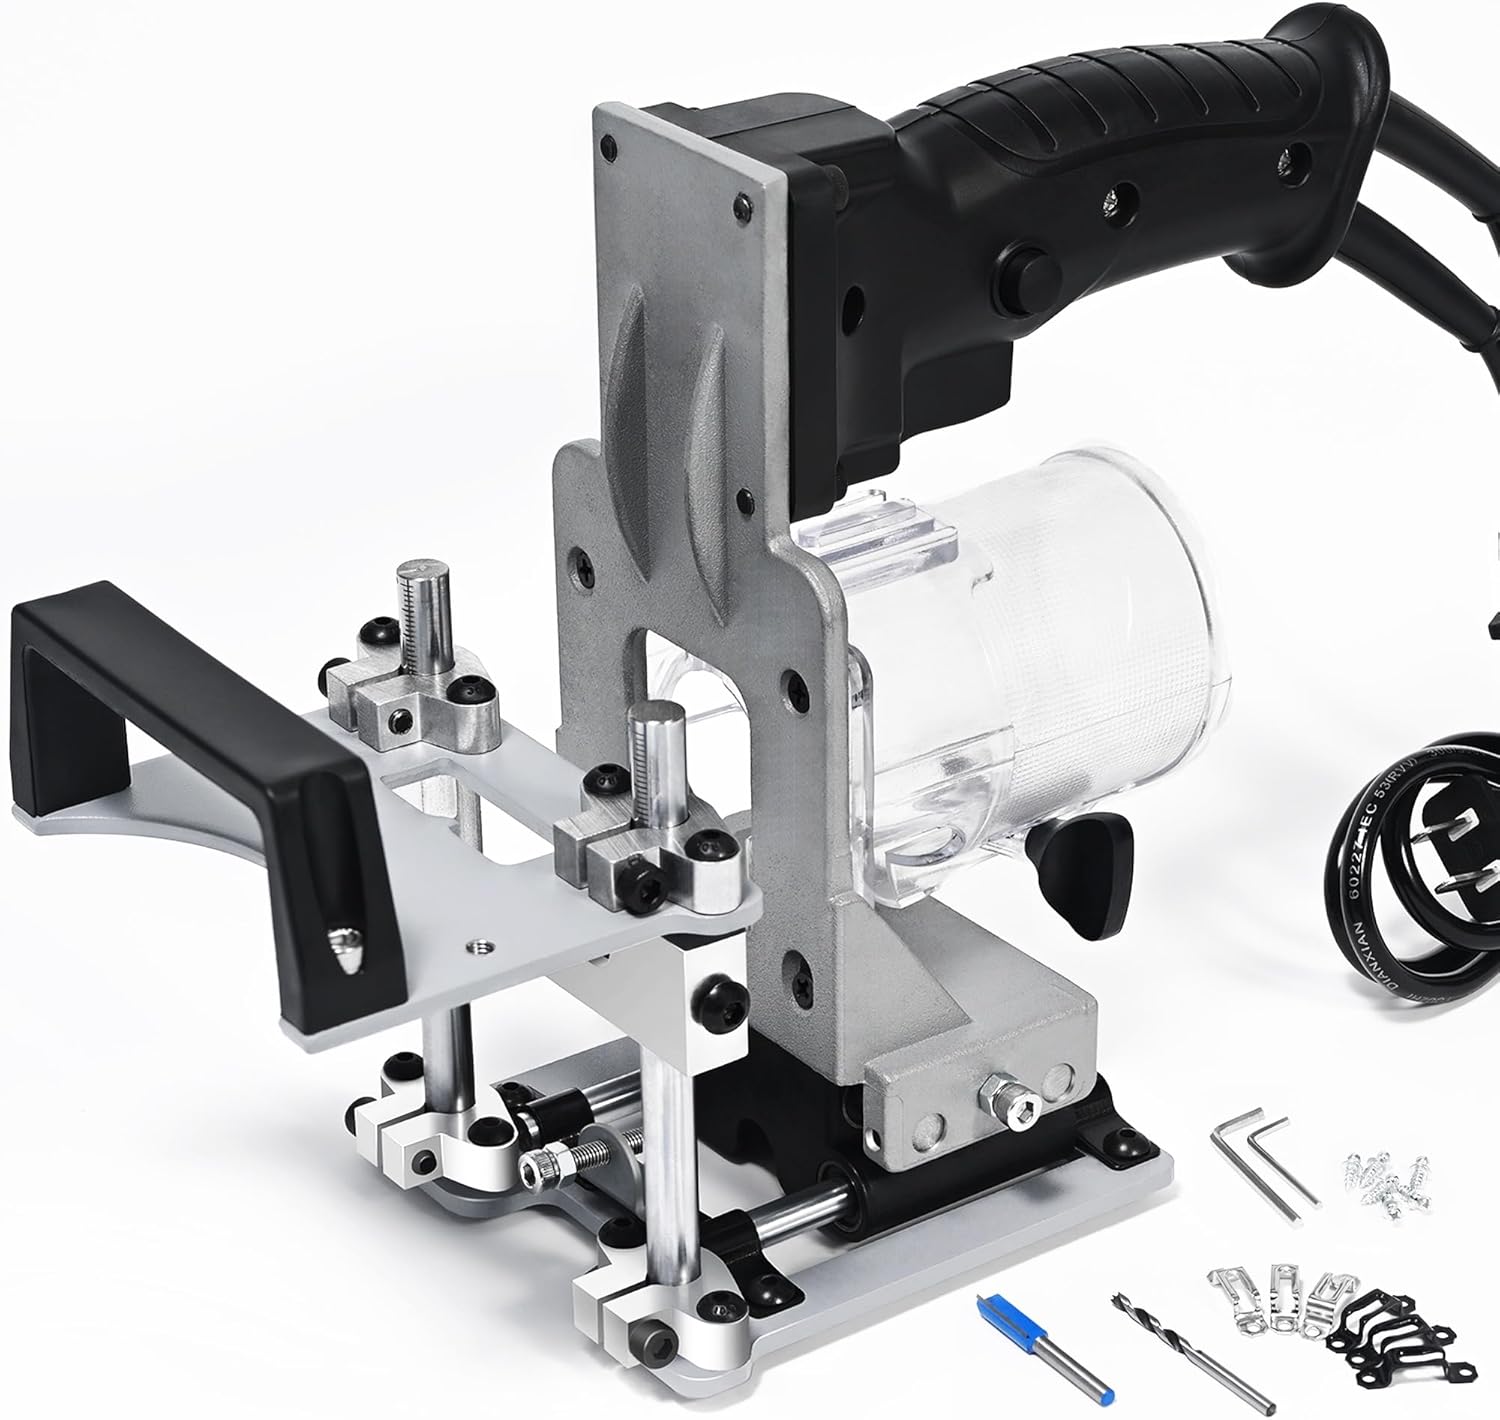
Mortise and Tenon Jig Tools for Woodworking Routers
Check on AmazonKey Specs:
- 2-in-1 System: Ideal for both mortising and tenoning with high precision.
- Adjustable Guide Rail: 3-axis system for easy left-right and up-down adjustments.
- Non-slip Handle & Auxiliary Handle: Designed for enhanced stability during operation.
- Transparent Dust Shield: Provides better visibility and protection during use.
- Lightweight & Portable: Weighs only 4.4 lbs, making it easy to handle and maneuver.
- Comes with Alloy Cutter & Small Tools: Ready to use with no wiring required.
- Voltage: 110V (suitable for standard U.S. power outlets).handling
The Mortise and Tenon Jig Tools for Woodworking Routers is a versatile 2-in-1 jig system designed to provide high-precision mortise and tenon joinery with efficient slotting and trimming. It’s compatible with routers having an outer diameter (O.D.) of 64-65mm, making it easy to use with a variety of woodworking tools (routers not included). The jig features a 3-axis guide rail system that allows for easy adjustments of length and width, offering precise control over your cuts.
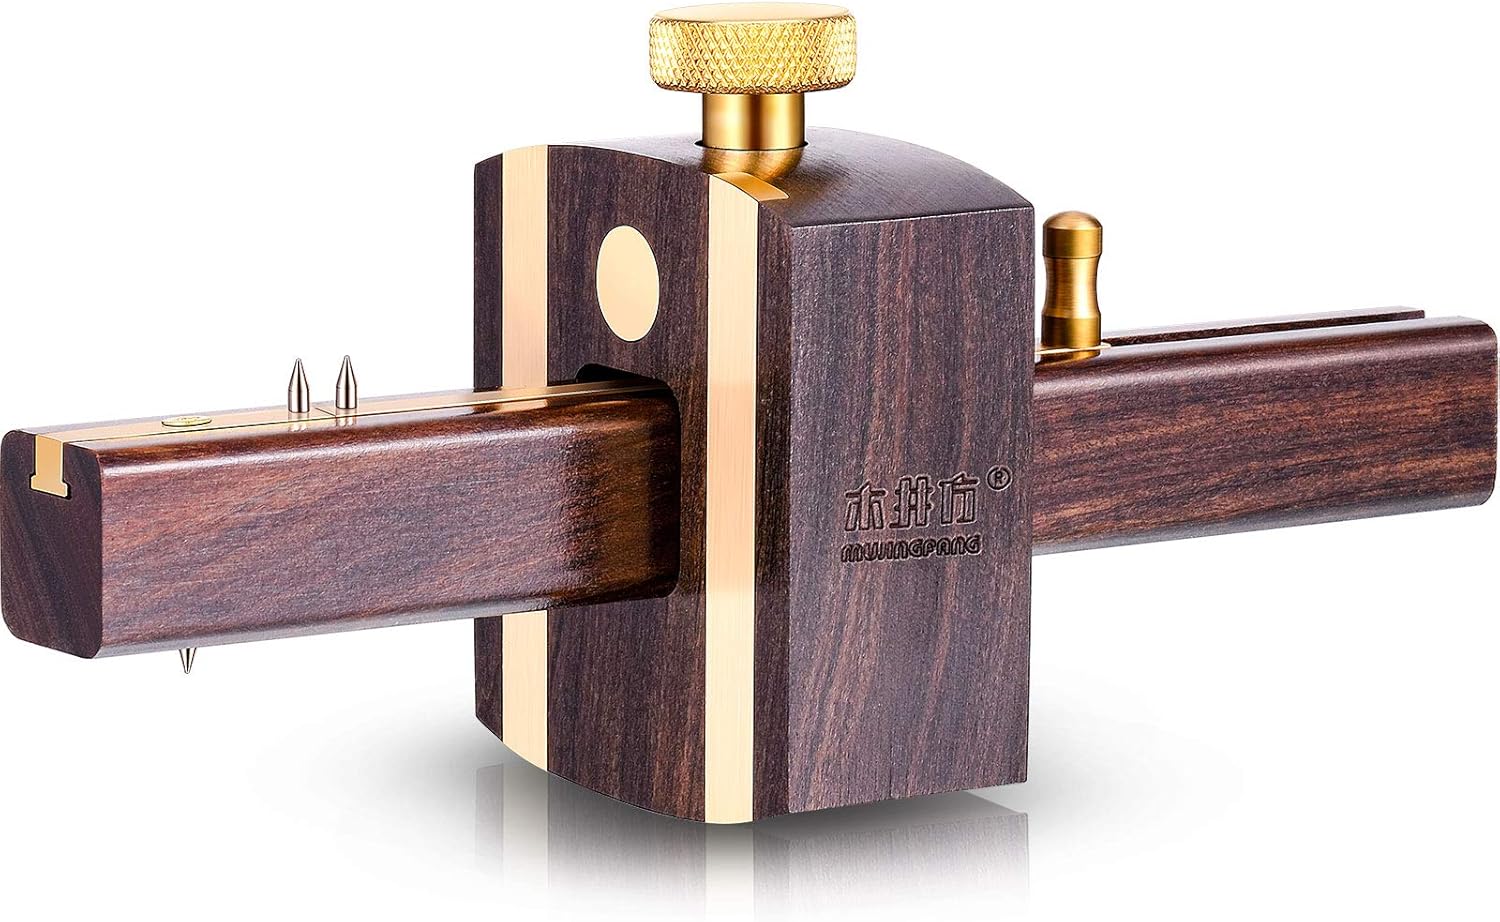
Mortise Gauge Woodworking Marking Gauge Ebony Mortise Square Gauge
Check on AmazonKey Specs:
- Material: Crafted from sturdy ebony and brass, offering durability, good hardness, and rust resistance for long-lasting use.
- Multi-Purpose Tool: Ideal for drawing straight lines on wood and marking for various joinery tasks, enhancing your woodworking projects.
- Adjustable Width: The width between the two needles can be adjusted from 0.21 to 3.9 inches (5.5 to 100 mm), allowing for versatile usage in different woodworking tasks.
- Double-Sided Design: Features three nails and the ability to draw single and double lines simultaneously, making it easier to complete tasks efficiently.
- Ergonomic Design: With a smooth, well-polished surface, this marking gauge ensures a safe, comfortable grip during use, enhancing overall precision.
The Woodworking Height Gauge is a durable and precise tool designed to meet your daily needs in woodworking. Made of high-quality aluminum alloy, it is tough, scratch-resistant, and offers a comfortable grip. The dual scale enhances measurement precision, while the slider locks smoothly for accurate results. Its portable design makes it easy to store or take with you. Ideal for measuring gear heights, saw blades, table drills, and more, this tool is a must-have for woodworkers.
Introduction
When it comes to woodworking, one of the fundamental joints that craftsmen often rely on is the mortise and tenon joint. This classic joint involves a tenon, a protruding piece of wood, fitting into a mortise, a cavity or hole, creating a strong and durable connection. Mastering the art of creating mortise and tenon joints is essential for any woodworker looking to build sturdy and long-lasting furniture pieces.
However, even the most experienced woodworkers can make mistakes that compromise the integrity of these joints. Avoiding these common errors is crucial in ensuring the strength and longevity of your woodworking projects.
Lack of Proper Measurement
Accurate measurements are the backbone of successful mortise and tenon joints. Without precise measurements, the joint may not fit correctly, leading to weak connections and wobbly furniture. To ensure accuracy, essential tools like a combination square, marking gauge, and calipers are indispensable. These tools help in marking and measuring the wood accurately.
| Tools for Precise Measurements |
|---|
| Combination Square |
| Marking Gauge |
| Calipers |
To measure accurately, always mark the wood with a sharp pencil or knife, ensuring clear and precise lines. Double-check measurements before cutting to avoid errors that can affect the joint’s fit.
Tips for Measuring Accurately:
- Use a sharp marking tool for clear lines.
- Double-check measurements before cutting.
- Invest in quality measuring tools for consistent results.
Incorrect Angle Cuts
Angle cuts play a crucial role in the strength and aesthetics of mortise and tenon joints. Incorrect angles can lead to gaps in the joint, compromising its integrity. Common mistakes include inaccurate angle measurements and improper cutting techniques. To achieve precise angle cuts, using a miter saw or a table saw with a miter gauge is recommended.
| Techniques for Accurate Angle Cuts |
|---|
| Use a Miter Saw for Precision |
| Check Angle Measurements Twice |
| Practice Cutting Scrap Pieces to Perfect Angles |
By practicing on scrap pieces and double-checking measurements, you can ensure that your angle cuts are precise and fit seamlessly into the joint.
Common Mistakes in Cutting Angles:
- Not double-checking angle measurements.
- Using a dull saw blade for cuts.
- Incorrect setup of the miter saw or table saw.
Poor Quality Wood Selection
The quality of wood chosen for mortise and tenon joints directly impacts the joint’s strength and durability. Selecting weak or warped wood can result in joints that are prone to breakage or misalignment. When choosing wood for your joints, opt for hardwoods like oak, maple, or cherry for their strength and stability.
| Tips for Choosing the Right Wood |
|---|
| Opt for Hardwoods for Strength |
| Avoid Warped or Twisted Wood |
| Select Wood with Straight Grain for Stability |
Inspect the wood for any defects or irregularities before starting your project to ensure a strong and reliable joint.
Common Mistakes in Selecting Wood:
- Choosing softwoods for load-bearing joints.
- Ignoring wood grain direction.
- Not checking for defects before starting.
Inadequate Glue Application
Proper glue application is essential for creating a strong bond in mortise and tenon joints. Inadequate glue coverage can result in weak joints that are prone to separation over time. When applying glue, ensure that both the tenon and mortise surfaces are evenly coated for maximum adhesion.
| Techniques for Glue Application |
|---|
| Use a Brush for Even Coverage |
| Apply Glue to Both Surfaces |
| Remove Excess Glue Before Assembly |
By following proper glue application techniques, you can create strong and durable mortise and tenon joints that withstand the test of time.
Common Mistakes in Applying Glue:
- Uneven glue coverage on surfaces.
- Using too much glue, leading to squeeze-out.
- Not removing excess glue before clamping.
Incorrect Assembly Process
The assembly process of mortise and tenon joints is a critical step that can make or break the final outcome of your woodworking project. The sequence of steps, including dry-fitting the joint, applying glue, and clamping, must be followed meticulously to ensure a tight and secure connection.
| Steps for a Smooth Assembly Process |
|---|
| Dry-Fit the Joint Before Gluing |
| Apply Glue Evenly on Both Surfaces |
| Use Clamps to Secure the Joint Tightly |
Skipping or rushing through any of these steps can result in a weak joint that is prone to failure. Take your time during the assembly process to ensure a perfect fit.
Common Mistakes Made During Assembly:
- Rushing through the glue application process.
- Not dry-fitting the joint before gluing.
- Insufficient clamping pressure for a tight fit.
Lack of Clamping Pressure
Clamping pressure is crucial in creating a strong and secure mortise and tenon joint. Without adequate pressure during the glue-up process, the joint may not fully bond, leading to weak connections. Using quality clamps and applying sufficient pressure ensures that the joint remains tight and stable.
| Techniques for Optimal Clamping Pressure |
|---|
| Use Bar Clamps for Even Pressure Distribution |
| Apply Pressure Gradually to Avoid Slippage |
| Check for Alignment During Clamping |
By paying attention to clamping pressure and ensuring a tight fit, you can create mortise and tenon joints that are strong and reliable.
Common Mistakes in Applying Clamping Pressure:
- Uneven pressure distribution across the joint.
- Insufficient pressure for a tight bond.
- Clamp slippage during the drying process.
Ignoring Joint Fit
The fit of the mortise and tenon joint is paramount to its strength and stability. A loose or ill-fitting joint can result in wobbly furniture that is prone to damage. Taking the time to ensure a snug and precise fit between the tenon and mortise is essential for a successful woodworking project.
| Tips for Ensuring a Precise Joint Fit |
|---|
| Test Fit the Joint Before Gluing |
| Adjust Tenon or Mortise for a Tight Fit |
| Check for Gaps or Misalignments |
By paying attention to the joint fit and making necessary adjustments, you can create sturdy and well-constructed mortise and tenon joints.
Common Mistakes in Neglecting Joint Fit:
- Assuming the joint will fit without testing.
- Ignoring gaps or misalignments during dry-fitting.
- Not adjusting the tenon or mortise for a tight fit.
Rushing the Drying Process
Allowing adequate drying time for the glue to set is crucial for the strength and durability of mortise and tenon joints. Rushing the drying process can result in weak bonds that are prone to failure. Patience is key when waiting for the glue to cure fully before removing clamps and applying stress to the joint.
| Techniques for Allowing Adequate Drying Time |
|---|
| Follow Manufacturer’s Recommendations for Glue Drying Time |
| Avoid Stressing the Joint Prematurely |
| Perform a Stress Test Before Full Use |
By giving the glue sufficient time to dry and cure, you ensure that your mortise and tenon joints are strong and reliable for years to come.
Common Mistakes in Rushing the Drying Process:
- Removing clamps too soon after gluing.
- Applying stress to the joint before the glue is fully cured.
- Skipping the stress test before final use.
Overlooking Joint Reinforcement
Reinforcing mortise and tenon joints can significantly increase their strength and longevity. Neglecting to add reinforcement, such as dowels or splines, can leave the joint vulnerable to stress and eventual failure. By incorporating additional support elements, you can enhance the structural integrity of your woodworking projects.
| Tips for Adding Reinforcement to Joints |
|---|
| Use Dowels or Splines for Added Strength |
| Align Reinforcement Elements with Grain Direction |
| Glue and Clamp Reinforcement Securely |
By considering reinforcement options and implementing them strategically, you can ensure that your mortise and tenon joints withstand heavy use and external forces.
Common Mistakes in Neglecting Joint Reinforcement:
- Assuming the joint is strong enough without reinforcement.
- Not aligning reinforcement elements with the grain direction.
- Using weak or improper reinforcement materials.
Not Allowing for Wood Movement
Wood is a living material that expands and contracts with changes in humidity and temperature. Ignoring this natural movement in mortise and tenon joints can lead to cracks, splits, or joint failure over time. By accommodating wood movement in your design and construction, you can prevent damage and ensure the longevity of your woodworking projects.
| Techniques for Accommodating Wood Movement |
|---|
| Allow Space for Expansion and Contraction |
| Use Slotted Holes for Attachment |
| Apply Finish to Seal Wood Surfaces |
By incorporating strategies to account for wood movement, such as using slotted holes for fasteners or leaving gaps for expansion, you can prevent structural issues in your woodworking projects.
Common Mistakes in Ignoring Wood Movement:
- Securing joints too tightly without room for movement.
- Not considering seasonal changes in wood dimensions.
- Skipping sealing finishes to protect against moisture.
Lack of Finishing Touches
Finishing touches not only enhance the appearance of mortise and tenon joints but also contribute to their durability and longevity. Skipping final touches like sanding, staining, or applying protective finishes can leave the joint vulnerable to wear and tear. By paying attention to these details, you can elevate the quality of your woodworking projects.
| Tips for Adding Final Touches to Joints |
|---|
| Sand Joints for Smooth Surfaces |
| Apply Stain or Finish for Protection |
| Regularly Maintain and Inspect Finished Joints |
By investing time in finishing touches and maintenance, you can ensure that your mortise and tenon joints not only look great but also stand the test of time.
Common Mistakes in Skipping Finishing Touches:
- Leaving joints rough or uneven after assembly.
- Skipping protective finishes for exposed wood surfaces.
- Not maintaining finished joints over time.
Failure to Test the Joint
Testing the strength and fit of mortise and tenon joints is a crucial step in ensuring their reliability and durability. Skipping this testing phase can result in overlooked issues that may lead to joint failure down the line. By conducting thorough tests before finalizing your project, you can identify and address any weaknesses in the joint.
| Techniques for Testing Joints Effectively |
|---|
| Apply Pressure to Assess Strength |
| Check for Movement or Flexibility |
| Perform Stress Tests for Load-Bearing Joints |
By incorporating testing into your woodworking process, you can catch potential issues early and make necessary adjustments for a stronger and more reliable joint.
Common Mistakes in Skipping Joint Testing:
- Assuming the joint is strong without testing.
- Not checking for movement or flexibility in the joint.
- Skipping stress tests for critical load-bearing joints.
Not Seeking Feedback or Guidance
Seeking feedback and guidance from experienced woodworkers can provide valuable insights and help you improve your woodworking skills. Neglecting to ask for advice or input from others in the woodworking community can result in missed opportunities for learning and growth. By reaching out and sharing your projects, you can gain valuable feedback and tips for enhancing your craft.
| Tips for Getting Feedback on Joints |
|---|
| Join Woodworking Communities or Forums |
| Attend Workshops or Classes for Hands-On Learning |
| Share Your Projects for Constructive Criticism |
By actively seeking feedback and guidance, you can accelerate your woodworking journey and refine your skills with the help of seasoned professionals and fellow enthusiasts.
Common Mistakes in Not Seeking Guidance:
- Working in isolation without external input.
- Missing out on valuable learning opportunities from experienced woodworkers.
- Not leveraging online resources and communities for advice.
Conclusion
In conclusion, mastering the art of creating mortise and tenon joints requires attention to detail, precision, and a commitment to avoiding common mistakes. By understanding the importance of accurate measurements, angle cuts, wood selection, glue application, assembly processes, clamping pressure, joint fit, drying time, reinforcement, wood movement, finishing touches, joint testing, and seeking feedback, you can elevate your woodworking skills and create strong and durable joints for your projects.
Remember, learning from mistakes is an essential part of the woodworking journey. Embrace challenges, seek guidance, and continuously improve your techniques to become a proficient woodworker.
FAQ
What are the essential tools for precise measurements in woodworking?
Tools like a combination square, marking gauge, and calipers are essential for accurate measurements in woodworking. These tools help in marking and measuring wood accurately, ensuring precise cuts and joints.
How can I ensure a tight joint fit in mortise and tenon joints?
To ensure a snug and precise joint fit, always test fit the joint before gluing, adjust the tenon or mortise for a tight fit, and check for any gaps or misalignments. Taking the time to perfect the joint fit is crucial for the joint’s strength and stability.
Why is it important to allow for wood movement in woodworking projects?
Wood is a living material that expands and contracts with changes in humidity and temperature. Ignoring wood movement can lead to structural issues like cracks or joint failure. By accommodating wood movement through design and construction techniques, you can prevent damage and ensure the longevity of your projects.