Are you a woodworking enthusiast looking to elevate your craft to the next level? Precision wood joinery is the cornerstone of creating durable and visually appealing wooden structures. One tool that can significantly aid in achieving this precision is the electric mortiser. This article will guide you through understanding, operating, and mastering the electric mortiser for your woodworking projects.
Wood joinery involves connecting wooden pieces together securely and seamlessly. The accuracy of these joints ensures the structural integrity and aesthetic value of your creations. Traditional methods like hand saws and chisels require skill and patience, but electric mortisers offer efficiency and consistency in cutting mortises for tenon joints.
Our Top Electric Mortiser Picks

JET Benchtop Mortiser
Check on AmazonKey Specs
- Reversible Column: Ideal for larger stock mortising
- Multi-position Handle: Provides customizable feed handle positioning
- Powerful Motor: 1/2-HP motor ensures smooth, consistent performance
- Depth Control: Quick-adjust depth stop for uniform mortise depths
- Safety Features: Removable On/Off switch prevents accidental operation
- 4o mini
The JET Benchtop Mortiser is a versatile tool designed for precise mortising in various woodworking projects. Its powerful 1/2-HP motor ensures smooth, consistent performance, while the adjustable column allows for mortising larger stock. The long, multi-position mortising handle offers customizable operation and comfort. With a quick-adjust depth stop, users can achieve uniform mortise depths. The tool is also equipped with a removable On/Off toggle switch for added safety and a three-jaw drill chuck that securely holds bits up to 3/8″ in diameter.
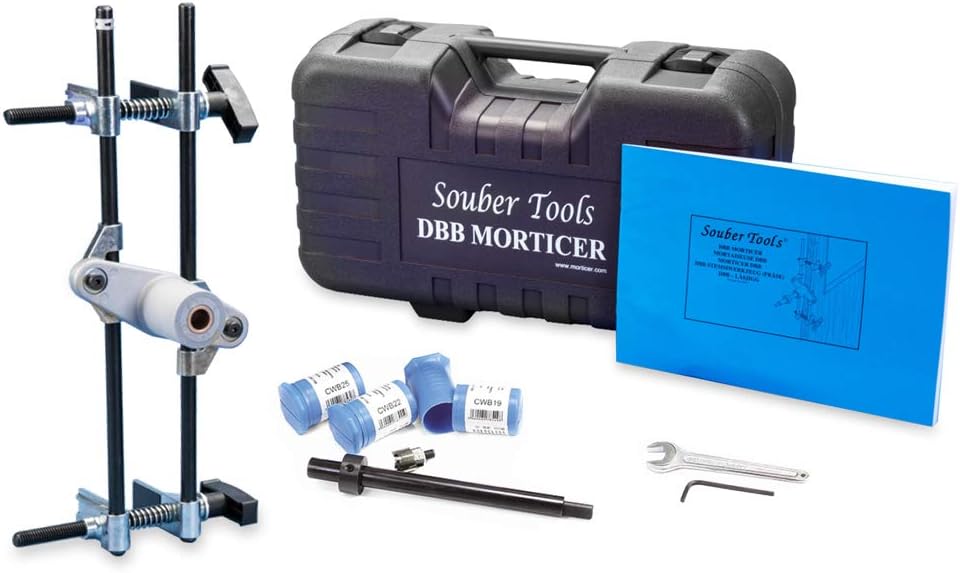
DBB Lock Mortiser
Check on AmazonKey Specs:
- Precision Mortising: Perfect for lock fitting and carpentry tasks.
- Compact Design: Dimensions of 20 x 11 x 7 inches, easy to store.
- Key Lock Functionality: Designed specifically for lock fitting.
- Includes Two Pieces: Comes with everything needed for efficient use.
- Reliable Performance: Delivers accuracy and durability for professional results.
The DBB Lock Mortiser by Souber is a specialized tool designed for precise lock fitting and carpentry tasks. This high-quality lock mortiser ensures accuracy and efficiency when installing locks, offering excellent performance for both professionals and DIY enthusiasts. With compact dimensions (20 x 11 x 7 inches), it is easy to handle and store. The tool comes with two essential pieces, making it a complete solution for lock fitting applications. Ideal for those working on door installations or custom carpentry projects, this lock mortiser provides the reliability needed for a flawless finish.
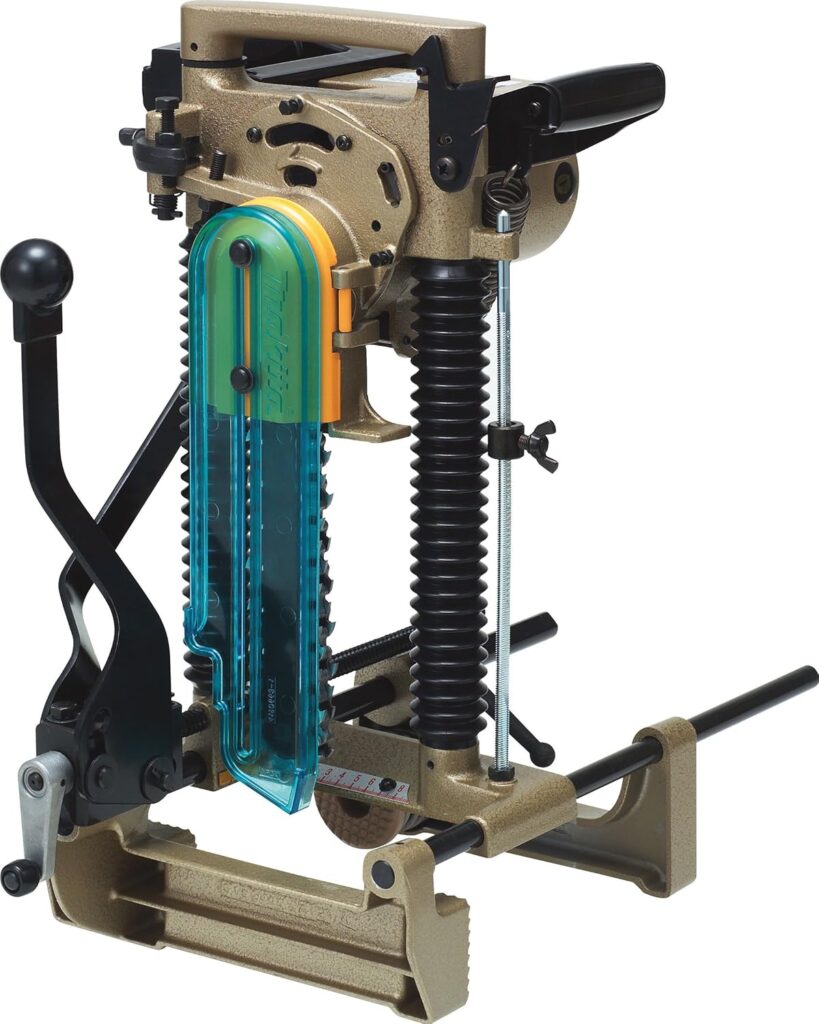
Makita – 7410L 7104L 10.5 Amp Chain Mortiser
Check on AmazonKey Specs:
- Powerful Motor: 10.5 AMP motor delivers 3,200 RPM for fast and efficient cutting.
- Portable Design: Lightweight at just 38.1
- lbs, making it easy to transport and use in
- various locations.
- Clean and Accurate
- Cuts: Razor-sharp chain ensures precision,
- ideal for notching and through-hole cutting.
- Lap Joint Capacity: Cuts lap joints up to 5-
- 1/8 inches.
- Adjustable Vise: Large
- adjustable vise and knob securely attach logs ranging from
- 3-1/8 inches to 12-1/8 inches thick, offering versatility for different sizes of material.
The Makita 7410L 7104L 10.5 Amp Chain Mortiser is a high-performance tool designed for precision cutting and notching in thick wood stock. With a powerful 10.5 AMP motor that reaches speeds of 3,200 RPM, this chain mortiser is capable of handling demanding tasks with ease. Its portability (weighing only 38.1 lbs) makes it ideal for both workshop and on-site jobs, while the razor-sharp chain ensures clean and accurate cuts.
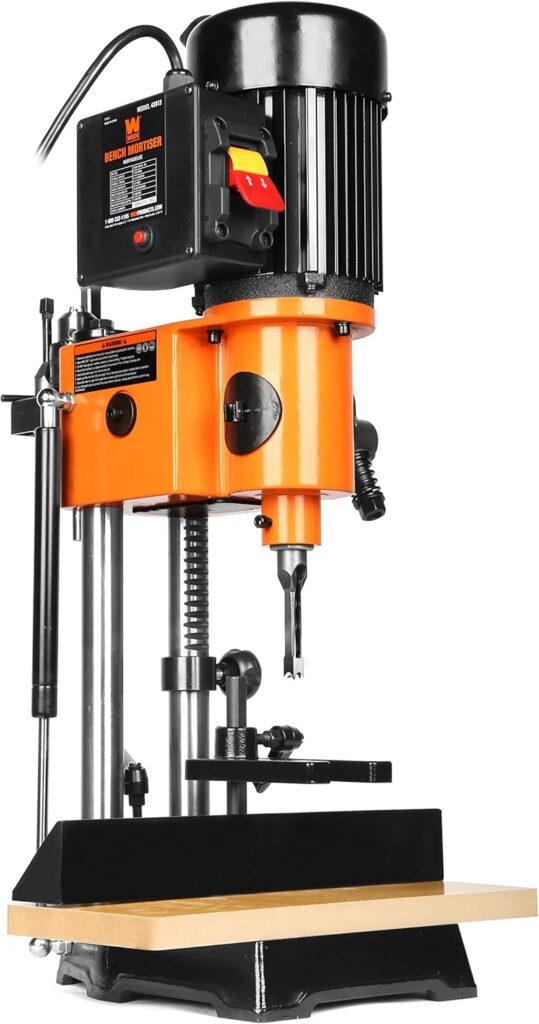
WEN Bench Mortiser
Check on AmazonKey Specs:
- Powerful Motor: 10.5 AMP motor delivers 3,200 RPM for fast and efficient cutting.
- Portable Design: Lightweight at just 38.1 lbs, making it easy to transport and use in various locations.
- Clean and Accurate Cuts: Razor-sharp chain ensures precision, ideal for notching and through-hole cutting.
- Lap Joint Capacity: Cuts lap joints up to
- 5-1/8 inches.
- Adjustable Vise: Large adjustable vise and knob securely attach logs ranging from
- 3-1/8 inches to 12-1/8 inches thick, offering versatility for different sizes of material.
The Makita 7410L 7104L 10.5 Amp Chain Mortiser is a high-performance tool designed for precision cutting and notching in thick wood stock. With a powerful 10.5 AMP motor that reaches speeds of 3,200 RPM, this chain mortiser is capable of handling demanding tasks with ease. Its portability (weighing only 38.1 lbs) makes it ideal for both workshop and on-site jobs, while the razor-sharp chain ensures clean and accurate cuts.
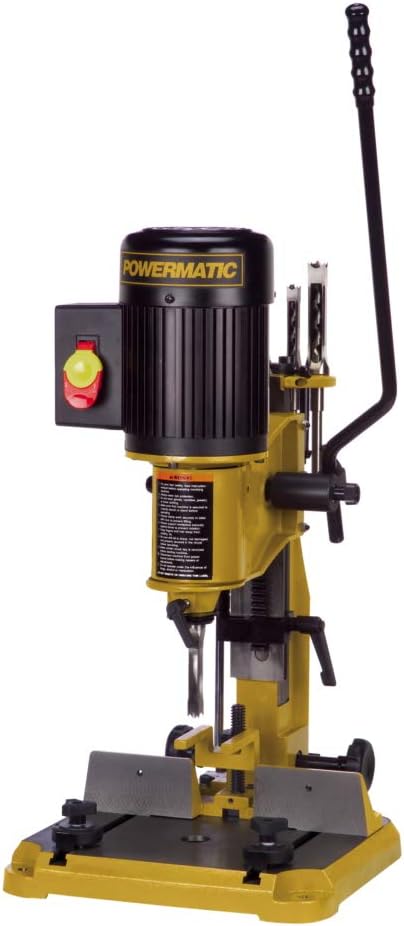
Powermatic Benchtop Mortiser
Check on AmazonKey Specs:
- Heavy-Duty Reversible Handle: Can be installed on either side of the head without tools, offering flexibility and convenience during operation.
- Integrated Bit and Chisel Spacers: Allow for quick setup, ensuring fast and efficient adjustments.
- Inline Depth Stop: Lets you stop at preset depths without racking the bit to the base, guaranteeing consistent and accurate cuts.
- Large, Hinged Chuck Door with Magnetic Catch: Provides rapid access to the chuck, making bit changes quick and easy.
- Chisel and Tool Holder with Sharpening Stone: Conveniently stores tools and includes a sharpening stone (chisels sold separately).
- Quick-Action Cam Lock: Locks the fence into position with a single 90-degree movement, reducing setup time.
The Powermatic Benchtop Mortiser is a precision tool designed for woodworking professionals who demand accuracy, efficiency, and ease of use. This versatile machine provides excellent performance with a range of user-friendly features, making it a must-have for carpenters and woodworkers who regularly cut mortises.
Understanding the Electric Mortiser
An electric mortiser is a specialized woodworking machine designed to cut square or rectangular holes, known as mortises, in wooden pieces. These mortises are then paired with matching tenons to create strong joints. The primary purpose of an electric mortiser is to streamline and automate the process of cutting mortises with precision.
The key components of an electric mortiser include a motor that drives the chisel, a sharp cutting tool or chisel, a sturdy base to support the workpiece, and adjustable features for controlling the depth and width of the mortise. Electric mortisers come in various types, such as benchtop models for smaller projects and floor-standing models for larger and more complex woodworking tasks.
Types of Electric Mortisers:
| Type | Description |
|---|---|
| Benchtop Mortisers | Compact and portable, suitable for small to medium-sized projects. |
| Floor-Standing Mortisers | Sturdier and more powerful, ideal for heavy-duty woodworking tasks. |
| Hollow Chisel Mortisers | Uses a hollow chisel and auger bit to create mortises in one step. |
Safety Precautions
Prioritizing safety when using woodworking machinery is crucial to prevent accidents and injuries. Always wear appropriate safety gear, including safety glasses, ear protection, and a dust mask to shield yourself from wood chips and debris. Ensure your workspace is well-lit, clean, and free of obstacles to maintain a safe working environment.
When setting up your electric mortiser, follow electrical safety measures by using grounded outlets and inspecting cords for any damage. Avoid overloading circuits and always unplug the machine when not in use. Familiarize yourself with the emergency stop features of the mortiser in case of any unexpected issues.
Important Safety Gear:
- Safety glasses
- Ear protection
- Dust mask
Selecting the Right Wood and Mortise Size
Choosing the appropriate wood for your woodworking project is essential for successful joinery with an electric mortiser. Hardwoods like oak, maple, and cherry are commonly used for their durability and strength. Softwoods like pine and cedar are easier to work with but may require additional support for heavy-duty applications.
Determining the correct mortise size is crucial for achieving a snug fit between the mortise and tenon. The size of the mortise should match the tenon dimensions to ensure a strong and stable joint. Consider the thickness and width of your wood pieces when selecting the mortise size for optimal results.
Matching Mortise and Tenon Sizes:
- Measure the tenon thickness and width.
- Create a mortise slightly larger than the tenon for a precise fit.
- Test the joint fit before final assembly.
Setting Up the Electric Mortiser
Prior to operating the electric mortiser, it is essential to set it up correctly for the specific task at hand. Adjust the depth and width of the mortise according to your project requirements. Secure the workpiece firmly in place using clamps or a vice to prevent movement during cutting. Align the fence and chisel to ensure straight and accurate cuts.
Take your time to make precise adjustments to the machine before starting. Double-check the settings and test on a scrap piece of wood to confirm the accuracy of the cuts. Proper setup is key to achieving professional results in your woodworking projects.
Tips for Setting Up:
- Mark the mortise locations on the workpiece.
- Secure the workpiece with clamps or a vice.
- Align the fence parallel to the edge of the wood.
Operating the Electric Mortiser
When operating the electric mortiser, always start the machine following the manufacturer’s instructions. Use steady and even pressure to guide the chisel into the wood, allowing the machine to do the cutting work. Implement techniques like making multiple shallow passes to achieve the desired mortise depth gradually.
Handle the workpiece with care to avoid splintering or tear-out during cutting. Maintain a firm grip on the wood and feed it into the chisel at a consistent rate. Practice proper technique and control to create clean and precise mortises for your woodworking projects.
Techniques for Precision Cuts:
- Make shallow initial cuts to establish the mortise depth.
- Clear out waste material regularly for smoother cutting.
- Use a backer board to prevent tear-out on the exit side of the cut.
Maintaining the Electric Mortiser
Regular maintenance of your electric mortiser is essential to ensure its longevity and optimal performance. Clean the machine after each use to remove sawdust and debris that can affect its operation. Lubricate moving parts as recommended by the manufacturer to prevent friction and wear.
Sharpening the chisel regularly is crucial for clean and efficient cutting. A dull chisel can cause tear-out and imprecise cuts, impacting the quality of your joinery. Check for any signs of wear and tear on the machine components and replace or repair them promptly to avoid safety hazards and maintain accuracy.
Maintenance Checklist:
- Clean the machine after each use.
- Lubricate moving parts as needed.
- Sharpen the chisel regularly for optimal cutting performance.
Troubleshooting Common Issues
Encountering issues with your electric mortiser during operation is not uncommon. Knowing how to troubleshoot common problems can save you time and frustration in the workshop. If you experience chisel jams, stop the machine immediately and clear the jammed material before continuing.
If you notice inaccurate cuts, check the machine settings and ensure proper alignment of the fence and chisel. Adjust as needed to correct the cutting angle or depth. In case of motor or power issues, refer to the manufacturer’s manual for troubleshooting steps or seek professional assistance if necessary.
Troubleshooting Tips:
- Clear chisel jams promptly to prevent damage.
- Check and adjust machine settings for accurate cuts.
- Consult the manual for motor or power-related issues.
Advanced Techniques for Precision Wood Joinery
Once you have mastered the basics of using an electric mortiser, you can explore advanced techniques to elevate your woodworking projects. Creating angled mortises adds complexity and visual interest to your joints, requiring precision and skill in setting up the machine.
Using templates for complex designs allows you to replicate intricate joinery patterns with consistency. Templates guide the cutting process and ensure uniformity across multiple pieces. Incorporating decorative details like chamfers or curves in your mortises enhances the visual appeal of your woodworking creations.
Advanced Techniques:
- Creating angled mortises for unique joint configurations.
- Using templates for intricate and repeatable designs.
- Adding decorative details to your mortises for a personalized touch.
Comparing Electric Mortisers to Traditional Methods
While electric mortisers offer efficiency and precision in cutting mortises, traditional hand tools have their own advantages and charm. Electric mortisers excel in speed and consistency, making them ideal for production work and large projects. However, hand tools allow for a more tactile and personalized approach to woodworking.
When choosing between an electric mortiser and traditional methods, consider the specific requirements of your project. Hand tools provide a hands-on experience and are quieter, making them suitable for smaller tasks or when precision is paramount. Electric mortisers shine in repetitive tasks and heavy-duty applications that demand speed and accuracy.
Choosing the Right Tool:
- Consider the scale and complexity of your woodworking project.
- Weigh the benefits of speed and consistency against handcrafted details.
- Use a combination of electric mortisers and hand tools for versatility.
Examples of Projects Using an Electric Mortiser
Putting your skills with an electric mortiser to the test, you can embark on various woodworking projects that showcase the precision and strength of mortise and tenon joints. Building a wooden table with mortise and tenon connections demonstrates the stability and durability of this classic joint.
Constructing a bookshelf with adjustable shelves allows you to customize the layout to suit your storage needs. The versatility of mortise and tenon joints enables you to create sturdy and adaptable furniture pieces. Crafting a wooden door with intricate joinery showcases the artistry and functionality of precision wood joinery.
Project Ideas:
- Wooden table with mortise and tenon joints
- Bookshelf with adjustable shelves
- Wooden door with intricate joinery
Tips for Efficient Workflow
To optimize your woodworking process when using an electric mortiser, consider implementing efficient workflow strategies. Planning your cuts in advance helps you work methodically and avoid mistakes. Batch processing similar mortises saves time and ensures consistency across multiple pieces.
Staying organized with your tools and materials reduces downtime and prevents misplaced items. Create a dedicated workspace for your woodworking projects, equipped with all the necessary tools and supplies within reach. Efficient workflow practices enhance productivity and quality in your woodworking endeavors.
Workflow Tips:
- Plan your cuts and workflow sequence before starting.
- Batch process similar mortises for efficiency.
- Organize tools and materials in your workspace for easy access.
Incorporating Safety Checks into Your Routine
Integrating safety checks into your woodworking routine is essential for maintaining a secure and hazard-free environment. Regularly inspect the electric mortiser for any defects or signs of wear. Replace worn-out parts promptly to prevent malfunctions during operation.
Training others on the safe use of the electric mortiser is crucial if you work in a shared workshop or teach woodworking skills. Educate beginners on safety protocols and proper operating procedures to prevent accidents and ensure a smooth woodworking experience for everyone involved.
Safety Checks:
- Inspect the machine for defects before each use.
- Replace worn-out parts promptly to avoid malfunctions.
- Train others on safe electric mortiser operation for a secure workspace.
Conclusion
Mastering precision wood joinery with an electric mortiser opens up a world of possibilities for your woodworking projects. By understanding the operation of the machine, prioritizing safety, and honing your skills, you can create durable and visually stunning wooden creations with confidence.
Remember to practice and refine your techniques regularly to improve your efficiency and craftsmanship. Precision wood joinery is both a skill and an art form that rewards dedication and attention to detail. Embrace the journey of woodworking and enjoy the satisfaction of creating beautiful pieces with precision joinery.
FAQ
Can an electric mortiser handle hardwoods?
Yes, electric mortisers are designed to cut through hardwoods like oak, maple, and cherry. Ensure you have a sharp chisel and set the machine to the appropriate speed and cutting depth for optimal results.
How often should I sharpen the chisel of my electric mortiser?
It is recommended to sharpen the chisel of your electric mortiser regularly, especially if you notice a decrease in cutting efficiency or quality. Depending on usage, sharpening every few weeks or months may be necessary.
What safety gear is essential when using an electric mortiser?
When operating an electric mortiser, always wear safety glasses to protect your eyes from wood chips, ear protection to reduce noise exposure, and a dust mask to prevent inhalation of sawdust particles.