A crown stapler is a versatile tool used for fastening a variety of materials together quickly and efficiently. It is commonly used in woodworking, upholstery, and construction projects. To ensure the best results and a professional finish, it is essential to use proper techniques when operating a crown stapler.
Our Top Crown Stapler Picks
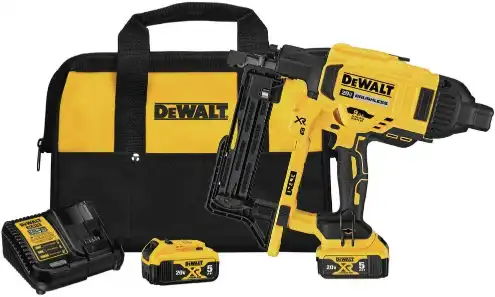
DEWALT 20V MAX* XR Crown Stapler
Check on AmazonKey Specs:
- 100% battery-powered; no gas or compressor needed
- Rapid Cycle and Sequential firing modes for control
- Tool-free depth adjustment for precise staple placement
- Low staple lockout to prevent dry firing
- Compatible with DEWALT 20V MAX* batteries and 9 GA fencing staples
The DEWALT 20V MAX* XR Crown Stapler delivers cordless convenience with 100% battery power, eliminating the need for gas, compressors, or hoses. I appreciate its Rapid Cycle and Sequential firing modes, allowing for precision and speed based on the task at hand. The variable power settings make it adaptable to different staple lengths, while the tool-free depth adjustment ensures precise penetration. The low staple lockout prevents dry firing, protecting both the tool and work material.
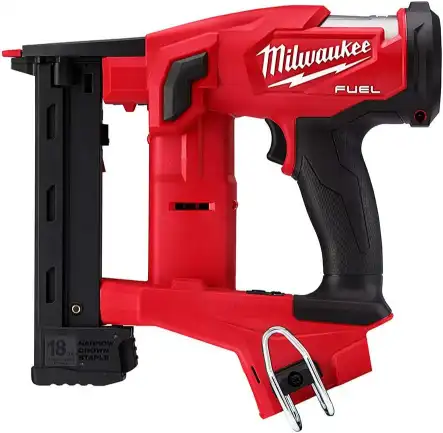
Milwaukee M18 Fuel 18Ga 1/4 Inch Narrow Crown Stapler
Check on AmazonKey Specs:
- Zero ramp-up time for instant performance
- Drives staples from 3/8″ to 1-1/2″ in length
- Consistent power for hard and soft materials
- Includes two work contact tips for precision
- Compact 11-inch design for maneuverability
The Milwaukee M18 Fuel 18Ga 1/4-Inch Narrow Crown Stapler offers precise and consistent staple setting across various materials. I appreciate its ability to drive staples into hard materials while maintaining adjustability for softer surfaces. With zero ramp-up time, it delivers instant power for efficient work. The wide staple length range (3/8″ to 1-1/2″) makes it versatile for different applications. The inclusion of two work contact tips enhances accuracy and control.
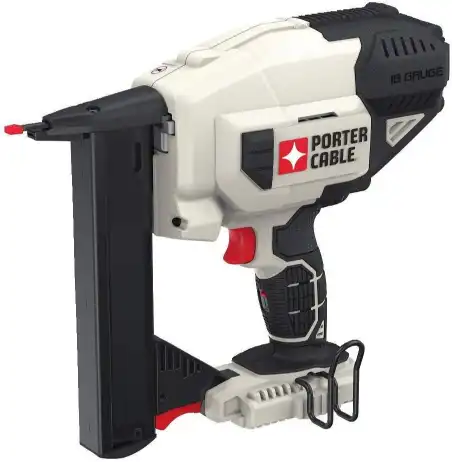
PORTER-CABLE PCC791B 20V Max Lithium 18 Gauge Narrow Crown Stapler
Check on AmazonKey Specs:
- 100% battery-powered; no compressor or gas needed
- Consistent firing power across various materials
- Tool-free settings for productivity and safety
- Lightweight design with optimal balance for comfort
- Dual LED lights for workspace illumination and error alerts
The PORTER-CABLE PCC791B 20V Max Lithium 18 Gauge Narrow Crown Stapler is a fully battery-powered solution, eliminating the need for compressors or gas cartridges. I appreciate its motor design, which delivers consistent firing power across different materials and climate conditions. Its lightweight build and well-balanced center of gravity reduce fatigue, making extended use more comfortable. The dual LED lights enhance visibility while also providing error indication for smoother operation.
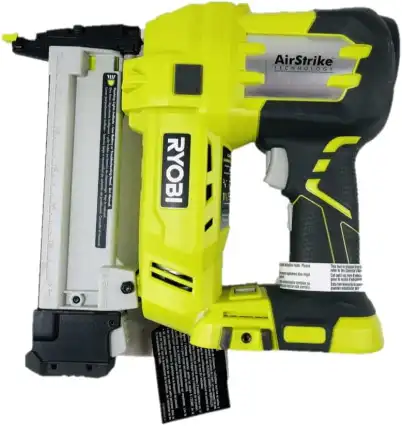
Ryobi ZRP360 18V Cordless Li-Ion 1-1/2 in. Crown Stapler
Check on AmazonKey Specs:
- Certified refurbished for like-new performance
- Drives narrow crown staples from 3/8″ to 1-1/2″
- Single sequential mode for precise placement
- Cordless design for maximum portability
- Battery and charger sold separately
The Ryobi ZRP360 18V Cordless Li-Ion Crown Stapler delivers reliable performance with its ability to drive staples ranging from 3/8 inch to 1-1/2 inches. I appreciate its single sequential mode, which ensures precise staple placement for detailed work. As a certified refurbished product, it meets quality standards while offering cost savings. Its cordless design enhances mobility, making it ideal for various stapling applications without the hassle of a compressor.
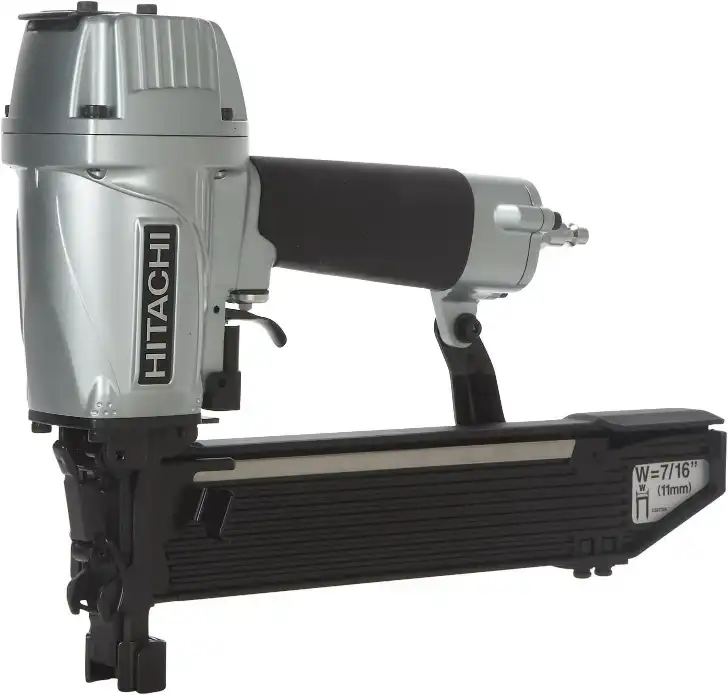
Hitachi N5008AC2 7/16″ Standard Crown Stapler
Check on AmazonKey Specs:
- Drives 16-gauge, 7/16″ crown staples (1″ to 2″ in length)
- Depth adjustment for precise staple placement
- Self-cleaning cylinder valve for fast, efficient operation
- 157-staple capacity for fewer reloads
- Operating pressure range: 70-120 PSI
The Hitachi N5008AC2 7/16″ Standard Crown Stapler is built for high-speed, precision fastening. I appreciate its self-cleaning cylinder valve, which ensures rapid driving while minimizing grease and grime buildup for long-term reliability. The depth adjustment feature allows for precise countersinking or flush driving in various materials. Its high-capacity magazine holds 157 staples, reducing downtime for refills, while the open magazine design provides quick visibility of remaining staples.
What Is a Crown Stapler
A crown stapler, also known as a staple gun, is a handheld tool that drives staples into materials to secure them together. It uses staples that are typically shaped like a crown, hence the name. Crown staplers come in different sizes and designs, including manual and pneumatic versions.
Importance of Using Proper Techniques for Secure and Clean Fastening
Using the correct techniques with a crown stapler is crucial for ensuring that the fastenings are secure and the finish is clean. Proper techniques not only improve the overall quality of the project but also contribute to the longevity and durability of the fastened materials.
Proper Staple Selection
Choosing the right staple size and type is essential for achieving strong and secure fastenings with a crown stapler. Understanding staple sizes and their compatibility with different materials is key to successful fastening.
Understanding Staple Sizes
Staples come in various sizes, typically measured by their crown width and leg length. Common staple sizes range from 1/4 inch to 1 inch in length. The size of the staple required depends on the thickness of the materials being fastened.
Choosing the Right Staple for the Material Being Fastened
When selecting staples for a project, consider the material you are working with. For softer materials like upholstery, shorter staples are suitable to prevent them from poking through. For thicker materials like wood, longer staples provide better holding power.
| Material | Ideal Staple Size |
|---|---|
| Upholstery | 1/4 inch |
| Wood | 1 inch |
Adjusting Staple Depth
Adjusting the staple depth on a crown stapler is crucial for controlling how far the staple penetrates into the material. Proper staple depth adjustment ensures that the staple is securely fastened without damaging the surface.
Importance of Adjusting Staple Depth
Setting the correct staple depth prevents staples from being driven too shallow or too deep into the material. Shallow staples may not hold securely, while deep staples can damage the surface or protrude on the other side.
How to Adjust Staple Depth on a Crown Stapler
Most crown staplers have a depth adjustment feature that allows you to control how far the staple is driven. Refer to the tool’s manual for instructions on adjusting the staple depth. Test on a scrap piece of material to ensure the setting is correct before starting your project.
Holding the Crown Stapler Correctly
The way you hold a crown stapler can significantly impact the stability and accuracy of your fastenings. Proper grip not only ensures precise placement of staples but also helps prevent hand fatigue during extended use.
Proper Grip for Stability and Accuracy
Hold the crown stapler with a firm grip using your dominant hand while supporting the material with your other hand. Position your fingers away from the trigger to avoid accidental firing. Maintain a steady hand to achieve accurate staple placement.
Avoiding Hand Fatigue During Prolonged Use
To prevent hand fatigue during long projects, take regular breaks to rest your hand and fingers. Consider using a stapler with ergonomic features like a comfortable grip and reduced recoil to minimize strain on your hand and wrist.
Positioning the Crown Stapler
Proper positioning of the crown stapler is essential for accurate and consistent fastening results. By maintaining the correct angle and distance from the material, you can ensure that the staples are placed exactly where you need them.
Importance of Proper Positioning for Accurate Fastening
Position the crown stapler perpendicular to the material surface for straight and secure fastenings. Maintaining a consistent angle and distance helps prevent staples from bending or misfiring, resulting in a professional finish.
Techniques for Maintaining Consistent Staple Placement
Practice aligning the crown stapler parallel to the edge of the material to achieve consistent staple placement. Use visual markers or guides to ensure that each staple is driven in the same position for a neat and uniform appearance.
Maintaining a Consistent Angle
The angle at which you hold the crown stapler can affect the strength and stability of the fastenings. Consistently maintaining the correct angle while using the tool ensures that the staples penetrate the materials evenly and securely.
Impact of Staple Angle on Fastening Strength
Angling the crown stapler too steeply or shallowly can weaken the grip of the staples. Aim to hold the tool at a consistent angle, typically perpendicular to the material surface, to achieve optimal fastening strength and prevent staples from bending or slipping out.
Tips for Keeping a Consistent Angle While Using a Crown Stapler
Practice your technique on scrap materials to find the most comfortable and effective angle for fastening. Maintain a steady hand and wrist position throughout the project to ensure that each staple is driven in securely and consistently.
Avoiding Jamming
Jamming is a common issue that can occur when using a crown stapler, leading to interruptions in your work and potential damage to the tool. By understanding the causes of jamming and implementing preventive measures, you can minimize the risk of jams.
Common Causes of Jamming in Crown Staplers
Jams can be caused by using the wrong staple size, overloading the magazine, or debris blocking the staple path. Additionally, worn or damaged staples can increase the likelihood of jams. Regular maintenance and proper staple selection can help prevent jamming.
Techniques for Preventing and Clearing Jams
To prevent jams, ensure that you are using the correct staple size and quality staples. Keep the staple magazine clean and free of debris by regularly clearing out any obstructions. If a jam occurs, follow the tool’s manual instructions to safely clear the jam before continuing your work.
Securing Wires and Cables
When fastening wires and cables with a crown stapler, it is essential to follow best practices to ensure a secure hold without damaging the materials. Proper technique not only keeps the wires in place but also reduces the risk of accidental damage or electrical hazards.
Best Practices for Fastening Wires and Cables with a Crown Stapler
Use insulated staples designed specifically for securing wires to prevent damage to the insulation. Position the wires flat against the surface before stapling to avoid pinching or cutting the wires. Secure the cables at regular intervals to prevent sagging or movement.
Ensuring a Secure Hold Without Damaging the Materials
Avoid over-tightening the staples when securing wires and cables to prevent crushing or cutting into the materials. Test the stability of the fastened wires by gently tugging on them after stapling to ensure they are securely held in place without any risk of slippage.
Fastening Upholstery
Fastening upholstery materials with a crown stapler requires specific techniques to ensure a secure hold and a professional finish. By following proper methods, you can prevent fabric damage and achieve a clean and polished look.
Techniques for Securely Fastening Upholstery Materials
Start by positioning the upholstery fabric taut and smooth before stapling to avoid wrinkles or puckering. Use shorter staples to prevent them from poking through the fabric. Staple along the edges and corners first, gradually working towards the center for even tension.
Maintaining a Clean and Professional Finish
Trim any excess fabric after stapling to create a neat and tidy appearance. Conceal the staples with decorative trim or fabric welting for a polished look. Regularly inspect the upholstery for loose staples and replace them as needed to maintain the integrity of the fastenings.
Installing Trim and Molding
Installing trim and molding requires precision and accuracy to achieve clean and secure fastening results. Whether working on decorative trim or functional molding, using a crown stapler can streamline the installation process when done correctly.
Importance of Precision When Fastening Trim and Molding
Position the trim or molding flush against the surface before stapling to ensure a tight fit. Use the appropriate staple size and angle to secure the trim without causing damage. Work methodically from one end to the other, spacing the staples evenly for a professional finish.
Tips for Achieving Clean and Secure Fastening Results
Pre-drill pilot holes for the staples in hardwood trim to prevent splitting. Angle the staples slightly towards the center of the trim to hide them from view. After stapling, fill any visible holes with wood putty and sand the surface smooth for a seamless and professional appearance.
Fastening Insulation
Properly fastening insulation materials is essential for maintaining energy efficiency and structural integrity in buildings. Using a crown stapler to secure insulation in place requires attention to detail and technique to ensure a secure hold.
Proper Techniques for Fastening Insulation Materials
Position the insulation batts or rolls snugly against the framing before stapling to prevent gaps or air leaks. Use longer staples for thicker insulation to ensure a secure hold. Staple along the edges and seams first, then fill in the center to prevent shifting.
Ensuring a Secure Hold for Energy Efficiency
Inspect the fastened insulation for any gaps or loose areas and reinforce them with additional staples as needed. Avoid compressing the insulation excessively with the staples, as it can reduce its effectiveness. Properly secured insulation helps maintain a consistent indoor temperature and reduces energy costs.
Creating Temporary Fastenings
There are various applications where temporary fastenings with a crown stapler can be useful, such as holding materials in place for glue to dry or temporary repairs. Knowing how to create and remove temporary fastenings without causing damage is essential for versatility in projects.
Applications for Temporary Fastenings with a Crown Stapler
Temporary fastenings can be used to hold fabric in place for sewing, secure templates for cutting, or tack down materials for painting. They provide a quick and easy way to position items before permanent fastening or assembly. Always consider the intended duration of the temporary hold when selecting staple size and type.
Techniques for Easy Removal Without Damage
To remove temporary staples without damaging the materials, use a staple remover tool or pliers to gently pull them out. Avoid pulling the staples forcefully, as it can tear or stretch the material. Inspect the surface for any staple remnants and clean up before proceeding with the next steps in your project.
Repairing Furniture
Using a crown stapler for furniture repairs can be a cost-effective and efficient way to restore the strength and stability of damaged pieces. Whether fixing loose joints, reupholstering chairs, or reinforcing frames, mastering proper techniques is essential for lasting and durable repairs.
Using a Crown Stapler for Furniture Repairs
Secure loose joints by applying wood glue and using staples to hold them in place while the glue dries. When reupholstering furniture, remove old staples carefully and replace them with new ones to secure the fabric. Reinforce weak or cracked areas of the frame with additional staples for added support.
Ensuring Strong and Lasting Repairs with Proper Techniques
Inspect the repaired furniture for stability and make any necessary adjustments or additional fastenings. Sand down any rough edges left by the staples and touch up the finish as needed to blend the repairs seamlessly. Properly repaired furniture not only looks good but also functions effectively for years to come.
Enhancing Safety
When using a crown stapler, safety should always be a top priority to prevent accidents and injuries. Following proper safety precautions and guidelines while operating the tool can help you work confidently and efficiently without compromising your well-being.
Importance of Following Safety Precautions When Using a Crown Stapler
Wear appropriate safety gear, including goggles to protect your eyes from flying debris and gloves to shield your hands from accidental stapling. Keep your fingers away from the staple exit point and never point the tool towards yourself or others. Always disconnect the power source before performing maintenance or clearing jams.
Tips for Preventing Accidents and Injuries During Operation
Avoid carrying a loaded crown stapler with your finger on the trigger to prevent accidental firing. Store the tool in a secure place when not in use, out of reach of children or unauthorized users. Regularly inspect the tool for any signs of wear or damage and replace worn parts immediately to maintain safe operation.
Final Thought
Mastering the essential techniques for using a crown stapler is key to achieving secure and clean fastening results in various projects. By understanding staple selection, adjusting depth, holding the tool correctly, positioning it accurately, and maintaining a consistent angle, you can work efficiently and effectively while ensuring the quality of your work.
Remember, proper technique not only enhances the appearance of your projects but also contributes to their durability and longevity. Whether you are fastening upholstery, installing trim, securing insulation, or repairing furniture, applying these techniques will help you achieve professional results every time.
FAQ
Q: Can I use a crown stapler for outdoor projects?
A: While crown staplers are versatile tools, it’s essential to consider the materials and weather conditions when using them outdoors. Opt for stainless steel staples for outdoor projects to prevent rusting and ensure long-lasting fastenings.
Q: How do I know if I’m using the right staple size?
A: The right staple size should penetrate the materials fully without protruding on the other side. Test on a scrap piece of material before starting your project to ensure the staples hold securely without causing damage.
Q: What should I do if my crown stapler jams frequently?
A: Frequent jamming can be caused by using low-quality staples or overloading the magazine. Ensure you are using the correct staple size and type for your project and keep the tool clean and well-maintained to prevent jams.